Tuesday, 23 March 2010

Easter Basket Projects For Easter Parties

Easter Basket Projects For Easter Parties
By Beverly Frank
If you are planning to have an Easter party it can be fun to include an Easter basket project as a fun craft to do during the party. This way you can have the kids occupied with something fun and best of all they have something really great to take home with them at the end of the party. You can also fill these crafts with goodies for a party favor which makes them extra special. Here are some Easter basket projects for Easter parties-
Woven Bunny Basket- This fun craft uses open weave small baskets (available at most craft stores) or you can recycle pint sized strawberry baskets.
What you will need:
  • A small basket with an open weave
  • Ribbon or precut foam pieces that measure the width of the open weave-Easter colors work especially well
  • A satin bow to tie on the handle
  • A tag for personalizing (optional)
Instructions for the project: Give each child a basket and the precut ribbon or foam pieces. They can then begin weaving them through the open weave of the basket. Have them continue weaving until the entire basket is covered. Tie the satin bow onto the handle and add a tag with their name on it if you want to.
Mini Easter egg baskets- These small baskets will charm your party guests with their springtime flair.
What you will need:
  • Mini Easter Baskets
  • Tacky Glue
  • Alphabet Beads
  • Nylon Monofilament
  • Colorful Trim-this can be ribbon, rickrack or even foam pieces
  • Artificial Easter Grass
  • Scissors
Instructions for the project: String on the alphabet beads to spell out the child's name on a piece of nylon monofilament. When you have all the beads on a string you can then push the ends through the basket weaving and tie off on the inside. Trim carefully and then glue on colorful trim. Put some grass in the bottom of the basket and fill with treats.
Cotton ball lamb basket- This charming basket will have your party guests thrilled with the results.
What you will need:
  • Empty Container
  • White Craft Foam
  • Styrofoam Egg
  • Wiggle Eyes-10mm work well
  • Cotton Balls
  • Low Temp Glue Gun
  • Scissors
  • Ribbon
  • White Acrylic Paint and Brush
Instructions for the project: Paint Styrofoam egg white and let dry completely. Cut two ears out of the craft foam. Make a small slit in the sides of the lambs head (the Styrofoam egg). Put a dab of glue on the ears and gently push the ends into the slits. Tear apart some cotton balls and glue to the head of the lamb. Tie the ribbon into a bow and glue to the lambs head. Carefully glue the cotton balls all around your container covering it completely. After the basket is dry you can glue the egg to the side near the top to make a head. Cut a 1" strip of craft foam and glue the ends to the sides to make a handle for your basket.
Easter Treasure Box- Who says that an Easter basket can only be a basket? This clever craft turns a simple box into an Easter treasure box that outshines any basket.
What you will need:
  • Paper Mache or small wooden treasure box (available at most craft stores)
  • Paints in a variety of Easter colors
  • Paint and Foam Brushes
  • Assorted decorating supplies (jewels, stickers, rub-ons, ribbon, markers etc.)
  • Glue Dots
  • Easter Grass
  • Plastic Eggs
Instructions for the project: Have the child paint the entire treasure box and let dry completely. It is important to prop the lid open as it dries. After the treasure box is completely dry have the child decorate the outside as they desire. Add some grass and plastic eggs.
Looking for more Easter activities? visit http://www.easterbunnyfun.net/ for crafts, coloring pages, recipes, poems, and the opportunity to share your best Easter memories.

Easter Crafts - How to Make Edible Miniature Coconut Bunny Nests

Easter Crafts - How to Make Edible Miniature Coconut Bunny Nests
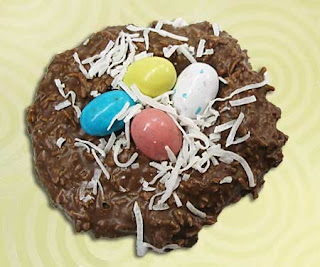
Making miniature nests is easy, fun and requires no particular skills. You will need a bag of shredded coconut, approximately one pound of white chocolate, food coloring and wax paper.
Place the chocolate in a microwave oven safe bowl and turn on high for two minutes. After the two minutes are up, stir the chocolate. Repeat, until the chocolate is melted. If you choose to melt the chocolate on the stove, use a double boiler. Chocolate burns very easily.
After the chocolate has melted, add a little food coloring. Green is nice if you want a grass looking effect. In order to work with the chocolate and coconut, it needs to be a little thick. Add coconut as needed. You may need to work quickly, depending upon the temperature in your home. Mix well.
Drop the mixture by spoonfuls on a sheet of wax paper. Size of the spoon is a personal choice, depending on how large you want to make the nests. While mixture is still warm and pliable, shape into a nest, by creating a hollow in the center of the mixture. They will harden quickly.
Before they harden, you may choose to put two or three jellybeans in each nest. These are "Bunny eggs." Yellow or white jellybeans can be used for duck eggs. Choice of candy fillings is up to you.
To use the nests to decorate a cake, place the nests on the cake along side a marshmallow bunny or duck. They can be used as decorations on top of gelatin and fruit salads or pies.

Monday, 15 March 2010

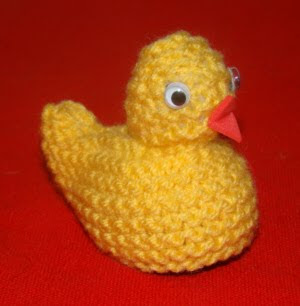
Easter Chick to Cover a Cream Egg

Easter Chick to Cover a Cream Egg
Easter is coming so we had better get cracking!!


To make an Easter Chick to Cover a Cream Egg you will need...
  1. Small amount of yellow DK yarn
  2. A pair of needles UK size 3.75mm / 9 / US 5
  3. Small amount of stuffing for the head
  4. Small piece of felt for the beak (or Red Craft Foam)
  5. Chocolate egg, plastic or hard boiled!
Body:
Cast on 26 stitches.
  1. Row 1: K1, increase 1, K to the end.
  2. Repeat first row until you have 36 stitches on the needle (10 rows)
  3. Knit four rows. (14 rows)
Shape the tail:
  1. Row 1: K3, bring yfwd, slip next stitch, ybk, move slip stitch back to left needle. Turn
  2. Row 2: K3 to end
  3. Row 3: K2, bring yfwd, slip next stitch, ybk, move slip stitch back to left needle. Turn
  4. Row 4: K2 to end
  5. Row 5: Cast off 10 stitches, K to end
  6. Repeat last five row for the other side to shape tail.
  7. You will have 16 stitches left in the centre of your knitting.
Head:
  1. Rows 1-4: Knit
  2. Row 5: K1, K2tog, K to last three stitches, K2tog, K1.
  3. Rows 6-8: Same as row 5
  4. Rows 9-10: Knit
This will leave you with 8 stitches. Cut the yarn leaving a length 30cm (12") long.Thread a needle with the 30cm length and run it through the 8 remaining stitches, pull them tight. Continue with the yarn to sew up the head, back and side leaving a hole big enough to insert an egg. Stuff the head lightly. Insert the egg, this will give you the body shape making it easy to see where the neck should be. With a needle threaded with the yarn, do a running stitch to cinch the neck (not too tight) fasten off securely. The eyes are french knots made from black yarn. However if the chick is for an older child or an adult - Glue on some wobbly eyes for comic effect! Sew on a beak made from red felt or Red Craft Foam.
Funky Fluffy Chicks
Using he same pattern and fluffy wool you can create really funky Easter Chicks.


Funky Easter Chick to Cover a Cream Egg

Fluffy Knitted Easter Chick


Go on Knit some Easter Chicks to cover Cadburys Cream Eggs for the Kids this Easter!


Garden Habitats to Encourage Wildlife into Your Garden

Our gardens are home to a wide range of living creatures. An average garden could hold over 2,000 different species of invertebrate. Many of these are very small, so are often over-looked. With all this diversity of life it is good to know that very few creatures cause significant damage to our prized flowers, fruit and vegetables, the ones that gardeners call pests. Even better, there are many more creatures that help us control the pests.

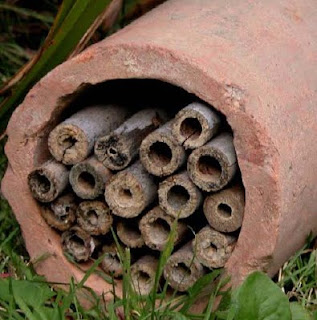
Holes for solitary beesBees Flats
Holes for solitary bees. There are many different
species of solitary bee, all are excellent pollinators. The
female bee lays an egg on top of a mass of pollen at the
end of a hollow tube, she then seals the entrance with a
plug of mud. A long tube can hold several such cells.
Hollow stems, such as old bamboo canes, or holes
drilled into blocks of wood, make good nest sites for
solitary bees. Holes of different diameters mean many
different species can be catered for.


Hedgehog houseHedgehog house
Hedgehogs are loved by most gardeners as the eat many slugs, they also consume earthworms, beetles, spiders, caterpillars, millipedes and woodlice. Hedgehogs need a secure place to build their nests in; a wooden box under a pile of sticks and debris in a sheltered corner is ideal. Our hedgehog home has
dry leaves inside as bedding.


Toad hole id=Toad hole
Frogs and toads eat many slugs and other garden pests. Although they need a pond to breed in, they can spend most of the year out of water. We use stone and tiles as these provide the cool damp conditions amphibians need. Newts may also take advantage of these conditions. Amphibians need a frostfree place to spend the winter; this could be in the centre of our habitat, inside the base of a dry-stone wall, under a pile of rubble or deep underground.


St Patrick's Day Kids' Crafts

St Patrick's Day Kids' Crafts
By Beverly Frank
St. Patrick's day is a great day for kid's crafts. It is a wonderful day to get out the paint, glue sticks, and crafting materials to create something to celebrate the holiday. The following are three great craft ideas of kids.
Blarney Stone:
A blarney stone comes from old Irish folklore. In southwestern Ireland, there is a very famous stone called the Blarney Stone. If you kiss the stone, you are said to be given the gift of eloquence. It is a big part of Irish tradition.
So, make your own Blarney stones at home as part of your St. Patty's Day crafts. To do this you need river stones, green paint, some googly eyes, and a black paint pen.
Start by painting the rocks green. You will have to wait for a while for them to dry, so it is best to do this in advance, and have an adult do it. Then, once the rock is painted, let your kids use the googly eyes, paint pen etc. to put a face on their very own Blarney stone.
You can use glitter, fabric, feathers, etc. to add a mouth, hair, and other accessories. Just don't forget to give it a smooch so that you can be eloquent.
Heart Shamrocks:
Shamrocks are a big deal in Irish culture as they are a symbol of luck. Any craft you make with shamrocks is a fun way to celebrate the holiday. A fun one for kids is to make a heart shamrock.
You need green construction paper, yellow construction paper, black crayons or markers, glue, scissors.
To make a heart shamrock you use the green construction paper and cut out three hearts. Arrange them into a shamrock shape, and cut out a stem. Use glue to attach them to the yellow construction paper. Then using the black crayons or markers, write out your felicitations of luck, such as "luck be with you" and then use it as a gift, card, etc.
Leprechaun Luck:
Leprechauns are mythic in Ireland, and are a great part of the St. Patrick's Day tradition. There are all sorts of lore surrounding leprechauns. So, one fun craft is to create a necklace using this lore.
To do this print out the following poem:
I keep three wishes handy,
In case I chance to meet
Any day a Leprechaun
Coming down the street.
Then create a shamrock, and write one wish on each leaf of the shamrock. Punch a hole in the top. Glue the poem to the side the wishes are not on, and string yarn through it to create a wish necklace. This can be worn during the day, to provide you with your green so that you do not get pinched, and is a fun way to grab hold of some Irish tradition.

Knitted Cupcake Egg Cosy - Knitting Pattern

Knitted Cupcake Egg Cosy - Knitting PatternBy Louise Foppoli

The kids seem to love lifting an egg cosy to find a hard-boiled egg underneath. I used a fluffy "sugar wisp" wool in the cream and brown cosy and my daughter refers to it as "the wild one".This is just a fun little knitting exercise that only takes minutes to make.
Abbreviations:
St(s) = stitches
K = knit
P = purl
Inc = increase knit (or purl) twice into stitch
K2tog (or p2tog) = work next two sts together
You will need:
Scraps of wool in two colours (for base and cake)for cupcake and red if you wish to add a cherry on top!
4mm knitting needles
Beads (if desired)
Cast on 24 stitches with 4mm needles in base colour.
Row 1-6: *K1, P1*, repeat from * to *.
Change to cake colour.
Row 7-16: Continue in stocking stitch.
Row 17: *K1, K2 tog* until end (16 sts)
Row 18: Purl
Row 19: K2 together until end (8 sts)
Break yarn and thread through remaining stitches pulling tightly.
Sew up side of cosy and attach cherry on top. Decorate with beads if desired.
Cherry Cast on 6 stitches. Knit six rows stocking stitch.
Cast off.
Sew running stitch around outside edges and gather tightly.
This pattern uses leftover scraps of wool and is fun to make. You can make a set of egg cosies with the same colour combination or you can make a different one for each member of the family. The children usually love choosing their colours and their beads. We now have a collection of egg cosies and the children choose according to their moods on the day. Makes for a fun breakfast!
Louise F is a busy Mum and a webmaster of a website featuring cupcake recipes and crafts. You can find more recipes and craft ideas at http://www.all-about-cupcakes.com

Perfect Valentines :: Tea Cosy Folk :: Santas Postbag :: Halloween Mania ::Zafyna

Make a Mothers Day Teapot for Mum on Mothering Sunday


If you love tea, you will love this beautiful hand painted Mothers Day Teapot craft idea. An unremarkable plain white teapot is decorated with hand painted love hearts to transform it into a very pretty looking teapot - Ideal for Mothers Day.


To make the Mothers Day teapot you will need...
A plain white teapot, you can buy these cheaply at The Range and Asda,
A fuchsia Marabu porcelain paint pen and a silver one too, you will find these at Hobbycraft.
You will also need a pencil and a ruler.

Start off by giving the teapot a good wash to remove and grease or dirt. Dry the teapot on a clean tea towel.

Now with the pencil and ruler, mark out some guide lines on the teapot. I know its a bit tricky because its not a flat surface, but do the best you can. It does look nicer if your writing is straight.

Next in pencil, write in the guide lines 'Happy Mothers Day'. You will probably need to write 'Day' below on another line. If you go wrong, rub it out with a damp peice of kitchen paper. When you are happy that all the text is central you can begine with the porcelain paint pens.

Before use, shake the Marabu porcelain paint pen well with the cap closed. Press onto the tip repeatedly until the ink is visible in it (do not continue once the ink appears in the tip as this may overload it).

If the nib does get a bit too full, draw on some scrap paper to reduce the surplus paint.
With the silver pen, go over the pencil text that you wrote. Then leave the teapot to one side to let the paint dry.

The paint does stay wet for a while and if you smudge it, it des spoil the look of the teapot.

Next either freehand or make yourself a little cardboard heart template, cover the teapot and lip in love hearts. The love hearts can be all sizes and they can go in any direction.

You can avoid smudging the paint by only doing a couple of hearts on one side, and then allowing them to dry for half an hour and then drawing some more. Build up in this way until the teapot is covered.

If you do smudge the paint - not to worry. Have a soapy damp cloth ready to scrub off your mistake. Make sure that this space dries properly before you try to paint on it again.

Once you are happy with your teapot, allow the paint to dry for 4 hours before baking the teapot in a preheated oven temperature for 170 degrees Celsius, 325 degrees Fahrenheit or gas mark 3. Bake the teapot for 30 minutes to fix the paint.

After baking, turn off the heat and open the oven door and allow the teapot to cool down before you remove it from the oven.

The Marabu-Porcelain Painter is dishwasher-safe after baking in the oven.

Friday, 12 March 2010

Juggling Cats


I call these “Juggling Cats” because they are just the right size to do that. However, if you are not into juggling, add catnip to the stuffing and give it to your cat to juggle. Or, add a cord and hang them to make people smile. Make them into ornaments, a keychain, a zipper pull...

You need:
Lily Sugar and Cream in colors of your choice.
“G” crochet hook
Polyfiber stuffing
Optional craft eyes (6 mm)
Yarn needle

Body:
Using white yarn color for face:
Make magic ring*, ch 1
Round 1: sc 6 into a magic ring, pull tight.
Round 2: sc 2 into each sc around (12 sc)

Change to yarn color for body:
Round 3: (sc 1 into next sc, then sc 2 into next), around (18 sc)
Round 4: (sc 1 into next 2 sc, then sc 2 into next) around (24 sc)
Rounds 5 to 9: sc around (24 sc)

If you are using plastic safety eyes, place them now.
Round 10: (sc 1 into next 2 sc, sc2tog) around (18)
Round 11 (sc 1 into next sc, sc2tog) around (12 sc)
Stuff with polyfiber.

Round 12: (sc2tog) around (6 sc)
Join with sl st to next st. Fasten off, pull tight to close and hide yarn end.


Ear - (make 2):
Make magic ring, ch 1
Round 1: 4 sc in magic ring (4 st)
Round 2: (sc 1 into next sc, sc 2 into next sc) twice (6 st)
Round 3: (sc 1 into next sc, sc 2 into next sc) three times (9 st)
Join with sl st to next st. Fasten off, leaving long end of yarn.

Tail
Ch 12
2 Sc into 2nd ch from hook, 2 sc into each ch until end
Fasten off, leaving long end of yarn.

Assembly:

Sew ears on top of face. Sew tail on back of body. Embroider some whiskers…and play!


Wednesday, 10 March 2010

How to Make Bath Bombs

How to Make Valentines Bath BombsHomemade valentines bath bombs are a great little craft to make for Valentines day and are lovely to share with your Valentine in the bath tub! The heart shaped Valentines baths bombs look really sweet and are so much nicer than shop bought bombs.

What could be more romantic on Valentines Day than soaking in a hot Bath with your Valentine watching these bath treats bubble and fizz in your bath, stimulating and soothing your skin. Relax and restore your body with a soothing scented bath bomb.

This bath bomb recipe is enough to make half a dozen fizzing bath bombs.

To make Valentines Bath Bombs you will need...

50g Citric Acid 100g Soda bicarbonate Half a teaspoon Red Food colouring 1 teaspoon Olive Oil 1 teaspoon Rose essential oils or a different fragrance if you prefer. And a love heart Ice cube tray to mould the bath bombs

Citric Acid and Soda Bicarbonate are available on Ebay and moderately priced.

Mix the Citric Acid and Soda Bicarbonate in a bowl with a spoon for a few minutes. You need to mix it really well so that the bath bomb fizzes properly in the bath.

Next add the olive oil and then the food colouring and then the essential oil. Give the mixture a good mix up again, to make sure that the essential oil is distributes though out the mixture.

The consistency of the mix should be that of damp sand.

Now pack the mixture into the heart shaped ice cube tray. Use the back of the spoon to pack it in tight. The firmer the bath bombs are made, the longer they will last in the bath. Leave the bombs in their moulds to harden for 5 minutes or so.

Turn the ice cube try upside down on a sheet of paper and give the back of the tray a tap with your hand over where you know the bath bombs are, and they should just slip out.

Leave the bath bombs to dry further for 3 hours. You can use them after 3 hours, but if you are able to leave them for 24 hours, they will last longer in water later.

Arrange your bath bombs in a soap dish with some flowers or rose petals and then you are ready to present them at the side of the candle lit bath.

If you have made the bath bombs well in advance, you will need to wrap them up in saran wrap, or some other cellophane wrapper to protect them from moisture in the air. Clear cellophane with a pint tint look pretty. Cut out a circle from the wrapping that is a bit bigger than the bath bomb. Place the bath bomb in the center and wrap the cellophane around it bringing all the surplus cellophane bunched up together at the top, like a little sack and wrap an elastic band around it. Tie a bow with plastic parcel ribbon over the elastic band to hide it.

Store your Valentines bath bombs in a cool dry place.

Want to add a little something extra?

Decorate your bath bombs with Loveheart sweets. Before filling the moulds with bath bomb mixture - pop a Loveheart sweet into the mould, writing side down, and them pack the mould in the usual way. When you turn the bath bombs out, they will have little messages on them. However the you wont be able to eat the sweets from the bath bomb, they are just for decoration.

Using a small amount of craft foam, cut a heart, which is a bit smaller than the heart moulds, and write a romantic bath time instruction on it using a permanent ink pen. This might be 'kiss my neck' or 'wash me' or 'Massage me', you won't have room to write very much. It's important to use a permanent marker pen, because other ink will just wash off in the bath water.

When you make your bath bombs, half fill the moulds and then add the foam heart, and them finish filling the mould with bath bomb mixture. Now you have a little Valentines bath game; drop a bath bomb into the bath and wait for it to release its instruction, whatever the bath bomb says, you have to do.


Pattern for Knitted Battery Hen Jacket / Jumper

Former battery hens which have lost their feathers are being knitted jumpers.

Video of Hens wearing the Jumpers


The Hens need your help!
Please knit a hen jumper and post it to...

Little Hen Rescue
The Stables
Greenways
Norwich
NR15 1QL
England


Pattern for Knitted Hen Jacket

Materials
Double knitting yarn (100g makes approximately 3 jumpers)
2 buttons or 10cm Velcro
1 pair of number 8 (4mm) knitting needles
4mm crochet hook
Knitted in stocking stitch with garter stitch borders
Cast on 41 sts,
Work 4 rows K
Increase for tabs;
Cast on 10 sts at beginning of next row, k14, p to last 4 sts, k4.
Cast on 10 sts at beginning of next row, k14, p to last 14sts, k14.
Work buttonholes; (work these 2 rows straight if using Velcro).
(K2, yf k2tog) 3 times, work to end keeping edges in garter st.
Repeat this row for buttonholes on the other tab.
Cast off 10 sts at beginning of next row.
Next row – cast off 10 sts, k4, p2 tog, p to last 6 sts, p2tog, k4.
Dec 1 st at each end on every fol 6th row until 25 sts remain.
Divide for neck;
Work 11 sts, cast off 3, work to end – complete this half first.
1) k4, p to end
2) cast off 2, k to end
3) k4, p to end
4) k2tog, k to end
5) k4, p2tog, p to end
Work 4 rows straight
10) K to last 5 sts, inc in next st, k4.
11) K4, p to last st, inc in next st.
12) Cast on 2 sts, k to end, (11sts)
13) K4, p to end
14) K
Break yarn and rejoin to the other side of neck.
Work to match, reversing shaping’s and ending at winghole edge.
Next row – k, cast on 3, k across sts from other side of neck.
Next row , k4 inc in next st, p to last 5 sts, inc in next st, k4.
Inc 1 st at each end of every fol 6th row until there are 41 sts on the needle.
Work 6 rows straight.
Change to gst and knit 4 rows.
Cast off.
Sew on buttons or Velcro as desired.
Work double crochet around neck.


http://littlehenrescue.co.uk/jumpers.aspx

How to Make a Love Heart Aerial Ball

How to Make a Love Heart Aerial Ball
This is the cutest Valentines gift for any car enthusiast - a Love Heart aerial ball. The heart has one of cupid's arrows going straight through it, to signify that it is love struck.

Aerial balls simply push onto the end of your car aerial personalising your car and making it much easier to find in that crowded car park.

To make the Heart Aerial Ball you will need...

Polystyrene Heart (You can find these in your local craft shop)
Some red and black enamel paints
Bamboo skewers
A black foam sheet and some clear drying glue for external use.

First push a bamboo skewer into the heart and the pointed part of the heart. This makes a great handle so that you can give the heart a couple of coats of red paint. Between coats you can stand the heart on its skewer in a glass.

You also need to give another skewer a couple of coats of black paint. You only need to paint half of the skewer, so again between coats you can stand it in a glass to dry.

Using the black foam sheet cut out 2 arrowheads and two arrow feathers.

Take the black skewer and cut of the unpainted surplus, and cut the remaining painted part in half. Stick the arrowheads to one of the sticks. Glue the arrowheads together with the end of the stick sandwiched in between making sure that the stick is well in and almost to the tip of the arrowhead. In a similar way, glue the arrow feathers to the end of the other part of skewer. Pegs make great clamps to hold everything in place whilst it sticks. Leave to one side to dry.

Use a new bamboo skewer to make a hole for the arrowhead part of the arrow to go. Push the arrow in and see how it looks and trim the skewer if it is too long. When you are happy, add some glue tot he hole and push the arrow into place.

Now make a hole for the feathers part of the arrow. Make sure that this part of the arrow lines up with the arrowhead otherwise you arrow will look bent. Again trim if necessary and glue into place.

Once the glue is dry it is ready for the car aerial! Wiggle the handle skewer that is in the point of the heart until the hole in the heat is about the same width as the aerial that it will be pushed on to. Then simply push the heart into place.

You could also try sticking wobbly eyes on your heart and adding a big smile with a black permanent pen. It looks fantastic and no one will have an aerial topper like yours, unless they have visited the Perfect Valentines website.