By Dale Higgins
When building a chicken coop, it is suggested that you follow the guidelines below for a successful endeavor.
Element #1. - Appearance and Design:
Sketch out your design on a sheet of paper before you do anything else. Think of the colors you will paint the roof and chicken coop walls. Always keep in mind that if your chicken coop is clearly visible to your neighbors, (unless you live in a farm it will most likely be visible to your entire neighborhood,) it shouldn't ever serve as a distraction or defacement of its utmost surroundings. So make sure to design an aesthetically looking chicken coop so that your neighbors do not complain of its detracting appearance. Once finished, always remember to remove and dispose of any types of garbage or weeds from around your chicken coop. Try to maintain an appealing landscape around it to enhance its overall appearance.
Element #2. - Using Sound Judgment:
When designing your chicken coop structure, you must use sound judgment in almost every aspect of the way.
For instance, you want to use building materials in which the cleaning and disinfecting procedures will be quick and easy. The doors you install should open inwards, not outwards. You don't want your chickens roosting on your windows, so it is best to install sliding windows.
A question many people ask is how to build a chicken coop who's floors are easy to hose and spray down without much puddling? Well the secret to that is to slightly slope the flooring toward the door. This way, when you spray out the chicken coop, the water will flow out, hence solving your puddling problem.
Element # 3. - Protection from Hazardous Elements:
So you want to learn how to build a chicken coop with maximum protection?
Then listen up.
As you may know, a well built chicken coop will protect your chickens from hazardous elements such as bad weather (heavy rain, wind, hale, snow, cold climates, etc,) but they will also protect them from hungry predators, theft and injury.
So how do we accomplish that?
Easy. You want to build a draft free chicken house with windows and doors that can be opened and closed as needed. Make sure the windows and doors both have proper screening systems installed in them such as a heavy gage mesh wire. Building the chicken coop on a high yet well drained area with ensure the least amount of dampness of the coop. Be sure to build your chicken coop in an area that faces the sun which will help warm and dry the soil and coop itself after it rains.
To protect your chickens from predators, the best thing to do is to bury your outside runs with chicken wire all around the coop about 1 foot deep. This will prevent some very hungry predators such as raccoons, cats and even dogs from digging underneath it.
Strategy # 4. - Coop Ventilation:
You may be wondering how to build a chicken coop that will not only keep your chickens locked up and protected from bad weather and predators yet receive the proper ventilation it requires. If so, then you already understand the importance of draft free air movement from within the coop. Chickens, much like humans, need fresh air and oxygen. The same goes for the removal of unwanted excessive moisture and carbon dioxide. A chicken coop with ample air movement and proper ventilation will help remove the ammonia build up and dampness that may grow inside its walls.
Speaking of walls, the chicken coop walls should have proper insulation installed which will help keep the chickens dry. As long as chickens are dry, they can handle cold climates very well, but humidity plus cold weather will cause health issues for your poultry. Therefore, insulated walls are a must!
Strategy # 5. - Light Source:
If you want a good source of light and warmth for your chickens during the cold months of the year and a solid source of ventilation during the hot months, then be sure to install the chicken coop windows facing the southside where they will receive direct sunlight throughout the day.
On another note, if your goal is to raise chickens that will produce great eggs all year round, then you should look into an electrical source of light. You should be able to easily install an electrical light at the height of the chicken coop's ceiling which will help keep your chickens warm and help them lay better chicken eggs throughout the year. One ceiling light should be enough for a small scale chicken coop, for larger chicken coops though, try to install one electrical ceiling light per every 30 - 40 feet.
Strategy # 6. - Conveniently placed Wateres and Chicken Feeders:
Chicken feeders and waterers should be placed where your flock will have easy access to them. However, you have to becareful where you place them because chickens like to make a mess of everything they eat due to their chicken scratching instincts. I'm sure you don't want to see your chicken feed mix all over the coop floors so, to avoid this, place the chicken feeders at the height of the chicken's back. This way they will have to stretch their necks up to eat but won't reach the feeders with their feet. Same goes for the waterers. Just make sure to keep the waterers full of fresh clean water throughout the day.
There you have it folks. 6 quick and easy strategies that will show you how to build a chicken coop fast and efficiently. Whether you're building a large scale chicken coop or a small one, these tips should get you moving in the right direction.
Folks, did you know that the average american spends about $300 to build a chicken coop? Some even invest over 2 months of work trying to assemble the darn structure and in the end aren't even fully contempt with their product. Not very enticing is it? A great chicken coop plan can cut your time and efforts in half while saving you a vast amount money on building materials. To learn how to build a chicken coop with maximum benefits for your flock without investing a magnitude of your time and money , click here:
how to build a chicken coop.
Dale Higgins has been raising chickens and poultry for over 20 years and is an expert in building chicken coops. You can visit his website here: http://www.mybackyardchickenfarm.com
Wednesday, 18 May 2011
How to Make an Origami Dragon
This is a brilliant video showing you step by step how to make an Origami Dragon. Grab your paper and follow on screen instructions.
Saturday, 14 May 2011
How to Make a DVD Box or Sleeve from a Template
It’s nice to give homemade CD or DVD’s of family photos or videos to friends and family as gifts. But when you buy the disc’s they don’t come with individual boxes or protective sleeves to ‘house’ the completed CD.However with a simple sleeve template you can quickly and cheaply create your own CD and DVD sleeves. Simply download the free DVD Sleeve template from the link below and save it somewhere handy on your computer.
Open the template into your graphics package and add photos, text and images that you have copies off Google Image searches.
You can of course also add a title and other text using your graphics package. You might want to add a greeting to the sleeve it you were giving the DVD as a birthday gift for example. You might want to add a date if the sleeve is for a wedding day DVD, so that in years to come you will remember the year the DVD was made.
You can go a bit further and give your DVD sleeve an authentic look by finding DVD icons on Google - Icons such as the DVD Video logo, DVD guidance rating icons, Regional icons, widescreen icons and so on.
If you are not confident to use a graphic package to decorate the CD sleeve, you could print it out blank and draw and write on the sleeve by hand.
When you have finished decoration the template sleeve, save the changes and print it out on to thin card. You may need to paste the image onto a word document and make the image a large size to get it to print out big enough to accommodate a disc. You might need to print out a couple until you get it spot on.
Once printed out, you need to cut out the sleeve, and score along the edges to be folded to give a nice crisp fold.
Fold the flaps that attach the back to the front inwards and stick them with paper glue to the inside of the sleeve. When the glue has grabbed the card, open the sleeve up a little and allow to dry open – just in case you were over zealous with the glue, you don’t want it sticking the front to the back.
Voila! You have a perfect personalised DVD or CD sleeve for your disc.
Download your template sleeve here...
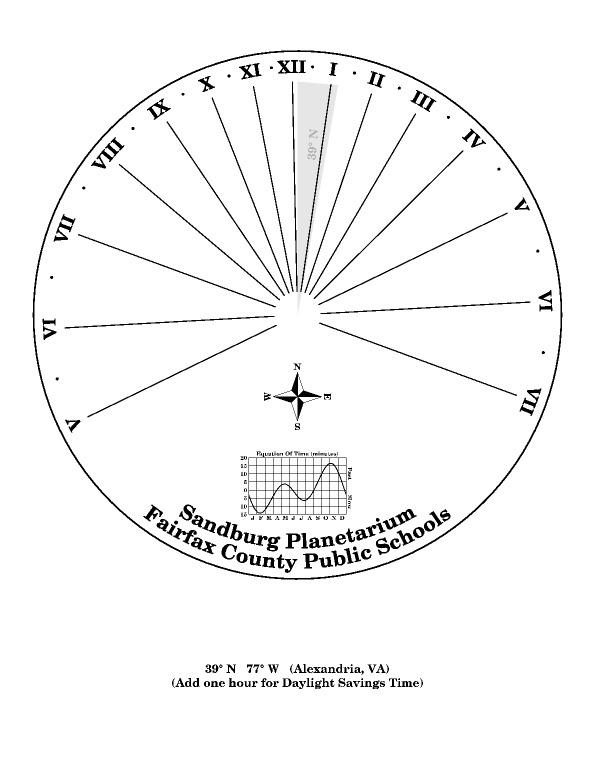
How to make a Medieval Wrist Watch (Joke Sundial Watch)
To make a medieval sundial wrist watch you will need...
Strong clear drying glue,
Brass paper clip – the type with opening out wings at the back,
Gold ink gel pen,
Wood stain,
Varnish,
Rock leather wrist strap,
And a drill bit attachment that cuts out circles this is to create the sundial face, so select an appropriate sizes drill bit.
Start buy cutting a circle from the MDF close to a corner. You need to cut it close to the corner because not only do you need a circle, but you also need a small triangle, and cutting the circle close to a corner means that you will cut out the two shapes in one go.
Give the circle and triangle a light sanding to make the edges neat and smooth.
Give the MDF a coat of dark wood stain. MDF is essentially wood dust glued together, so it doesn’t have a grain to it, but if you pain the wood stain on with a brush and paint in the same direction, you can give the wood an appearance of grain. Leave to dry and them apply wood stain in the same way to the other side and edges.
Next with the gold ink gel pen you need to draw on roman numerals in the correct places on the face of the sundial. You could search Google images for a sundial faces for an example to copy.You could also add a logo to the bottom part of the face. I chose to add the Rolex logo, which is a simple crown shape. Again you can search Google images for watch logos to copy.
The medieval way was to embellish everything. So I drew gold borders on both sides and edges of the sundials triangle.
When the ink has properly dried, apply a coat of clear varnish to the wood to protect the ink.
When the varnish has dried, take the brass coloured paper fastener and open up the flaps at the back and fold them out flat. Put the fastener down on the table vertically, with the head facing upwards. Then with the wrong side of sundial, add a blob of clear drying glue to the drill hole that the circle left in the face of the sundial. Turn the face over and hold it the right way up, (on a modern watch this would be with 12 at the top or furthest away from you). Then stick the face onto the paper fastening head.
If you imaging there’s a line coming down from 12 to 6, this is the line that the paper fastener need to follow at the back of the face.
With paper fastener in place, apply some glue to one edge of the triangle, and stick it to the top half on the sundial along the 12 to 6 line. The curve of the triangle should curve from the ‘12’ position and there should be a tall point in the centre of the sundial face. Clean off surplus glue and leave to dry.
Put the leather wrist strap on, and do it up. If the recipient is bigger or smaller than you need to guesstimate the size that it would be done up at. With the buckle at the back of the wrist, make a mark with a pen on the strap on the top middle of the wrist. This is where the sundial face will attach to the strap.
If your leather rock wrist strap has studs, simply remove the stud where you marked the centre. If it’s just a leather strap, you will need to make a hole at this point.
Close the paper fastener wings together and push them through the strap and open them out again on the other side of the strap. Add a bit of glue to stick them to the strap. You could also stick some ribbon over the wings to conceal them and to make the sundial watch more wearable.
And there you have it, a medieval Rolex watch – solar powered because obviously you do need the sun for it to work – the perfect gift for any medieval lord.
How to make Apple Tree Weights to Train Your Apple Tree
I recently bought a new apple tree for the garden. I have a modest sized garden and it wouldn’t have room for a large apple tree, and besides, my neighbour wouldn’t be very happy if I had a large tree blocking the sun light to their garden, so I have decided to bend the branches of my apple tree so that it grown downwards.
I saw this done to an apple tree on a gardening television program. Bending the apples trees branches over has a few benefits, the tree wont get taller, its fruit will be at picking height and I wont need to climb a ladder, but also the tree will bare more fruits that are of a better quality. Additionally you can keep a look out more readily for spoiling pests and diseases.
According to gardening experts, bending the branches of apple trees increases the yield of fruit because the apple tree then makes less foliage and instead produces more fruit. But also the fruits are of better quality because the tree is effectively upside down; more liquid inside the tree reaches the fruits.
It is suggested to train your apple tree, that you tie weights to young branches. The weights might be half a brick or a plastic bottle filled with water. I didn’t fancy the prospect of attaching such unsightly things to my beautiful new apple tree so I thought up an alternative solution, which would look less intrusive – Apple tree weight pebbles!
I simply took a lovely big pebble; I have a few in the garden that we had collected from the beach with the kids when they were little. They were perfect, large weighty, and had been selected for they pleasant appearance.
I glued the pebbles onto clothes pegs with ‘No Nails’ glue and I left them to dry over night.
The following morning I pegged the ‘apple tree weights’ to the ends of the branches below the foliage, applying one pebble weight to each branch. Sure enough they pulled the branches downwards and hung there pleasantly.
Not only do the pebble apple tree weights look astatically pleasing, but they are also kind to the tree. There are two holes in the jaws of the clothes peg, and one is smaller than the other. I was able to select a hole for each branch they wouldn’t be a pinch fit for the tree. Obviously if it were a snug fit on the tree, the branch wouldn’t have room to allow the branch to grow and widen. A tight fit would also hinder the movement of sap down the branch and affect my apple crop, which certainly isn’t desirable.
Another advantage of the pebble apple tree weights is that when a branch has been trained and stays in position without need of the weight, I can simply un-peg it, and peg it to another branch very simply and easily.
Wednesday, 11 May 2011
Handmade Cards Project
This is a project card that I picked up at Hobbycraft which gives you project ideas for handmade cards.
If you click on the images they will open out bigger so that you can read them.
Wednesday, 4 May 2011
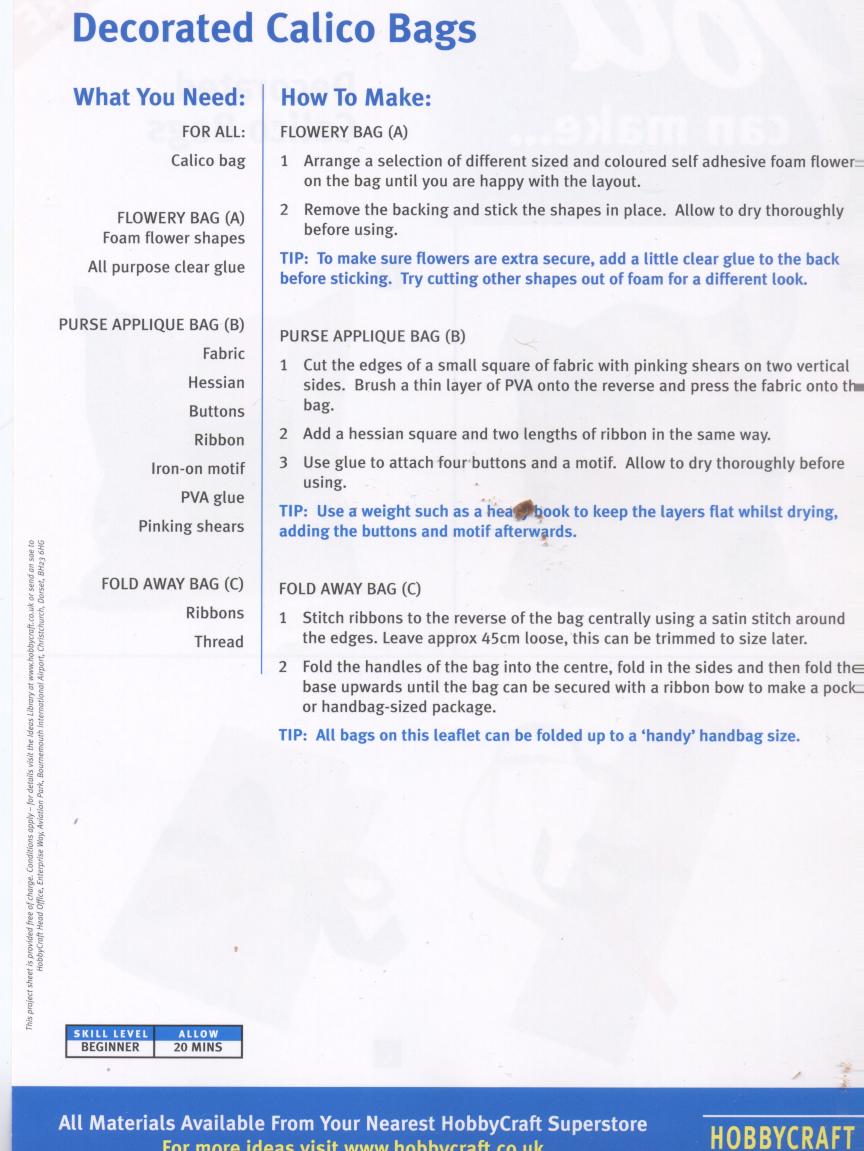
Making Fun and Trendy Shopping Bags
This is a craft project from Hobbycraft.
Get a simple plain shopping bag and add some decoration with fabric pens, appliqué, buttons and beads.
Click on the images below to make them big enough to read.
Get a simple plain shopping bag and add some decoration with fabric pens, appliqué, buttons and beads.
Click on the images below to make them big enough to read.
Subscribe to:
Posts (Atom)