Saturday, 14 May 2011

How to make a Medieval Wrist Watch (Joke Sundial Watch)

Medieval Sundial Wrist WatchIf you are having a medieval theme wedding, it’s nice if you can keep the medieval theme going through most of the day. Medieval gifts for the important guests who played an active role in the wedding can be tricky, if you want it to have a medieval association. It’s traditional to give the best man a sentimental gift and watches are popular. With this in mind, I made our best man a medieval Rolex watch, which we introduced as a Rolex prototype that was being developed during medieval times. We advised the best man as he unwrapped his gift, that it worked on solar power so would only worked if the sun was shining. This sundial got great laughs during the Grooms speech, and was really good fun.

To make a medieval sundial wrist watch you will need...
Medieval Sundial Wrist Watch6mm thick scrap of MDF,
Strong clear drying glue,
Brass paper clip – the type with opening out wings at the back,
Gold ink gel pen,
Wood stain,
Varnish,
Rock leather wrist strap,
And a drill bit attachment that cuts out circles this is to create the sundial face, so select an appropriate sizes drill bit.

Start buy cutting a circle from the MDF close to a corner. You need to cut it close to the corner because not only do you need a circle, but you also need a small triangle, and cutting the circle close to a corner means that you will cut out the two shapes in one go.

Give the circle and triangle a light sanding to make the edges neat and smooth.

Give the MDF a coat of dark wood stain. MDF is essentially wood dust glued together, so it doesn’t have a grain to it, but if you pain the wood stain on with a brush and paint in the same direction, you can give the wood an appearance of grain. Leave to dry and them apply wood stain in the same way to the other side and edges.
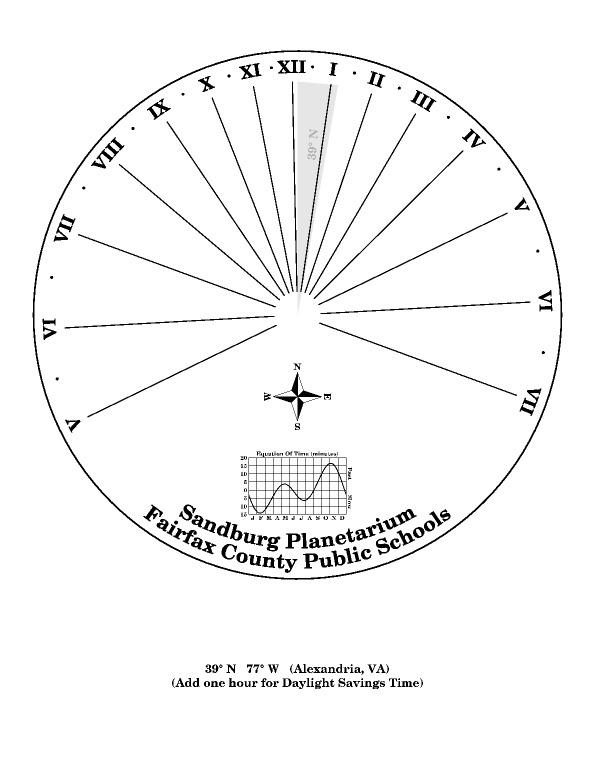
Medieval SundialNext with the gold ink gel pen you need to draw on roman numerals in the correct places on the face of the sundial. You could search Google images for a sundial faces for an example to copy.

You could also add a logo to the bottom part of the face. I chose to add the Rolex logo, which is a simple crown shape. Again you can search Google images for watch logos to copy.

The medieval way was to embellish everything. So I drew gold borders on both sides and edges of the sundials triangle.

When the ink has properly dried, apply a coat of clear varnish to the wood to protect the ink.

When the varnish has dried, take the brass coloured paper fastener and open up the flaps at the back and fold them out flat. Put the fastener down on the table vertically, with the head facing upwards. Then with the wrong side of sundial, add a blob of clear drying glue to the drill hole that the circle left in the face of the sundial. Turn the face over and hold it the right way up, (on a modern watch this would be with 12 at the top or furthest away from you). Then stick the face onto the paper fastening head.

If you imaging there’s a line coming down from 12 to 6, this is the line that the paper fastener need to follow at the back of the face.

With paper fastener in place, apply some glue to one edge of the triangle, and stick it to the top half on the sundial along the 12 to 6 line. The curve of the triangle should curve from the ‘12’ position and there should be a tall point in the centre of the sundial face. Clean off surplus glue and leave to dry.

Put the leather wrist strap on, and do it up. If the recipient is bigger or smaller than you need to guesstimate the size that it would be done up at. With the buckle at the back of the wrist, make a mark with a pen on the strap on the top middle of the wrist. This is where the sundial face will attach to the strap.

If your leather rock wrist strap has studs, simply remove the stud where you marked the centre. If it’s just a leather strap, you will need to make a hole at this point.

Close the paper fastener wings together and push them through the strap and open them out again on the other side of the strap. Add a bit of glue to stick them to the strap. You could also stick some ribbon over the wings to conceal them and to make the sundial watch more wearable.

And there you have it, a medieval Rolex watch – solar powered because obviously you do need the sun for it to work – the perfect gift for any medieval lord.


How to make Apple Tree Weights to Train Your Apple Tree

How to Make Apple Tree Weights to Train Your Apple Tree
I recently bought a new apple tree for the garden. I have a modest sized garden and it wouldn’t have room for a large apple tree, and besides, my neighbour wouldn’t be very happy if I had a large tree blocking the sun light to their garden, so I have decided to bend the branches of my apple tree so that it grown downwards.

I saw this done to an apple tree on a gardening television program. Bending the apples trees branches over has a few benefits, the tree wont get taller, its fruit will be at picking height and I wont need to climb a ladder, but also the tree will bare more fruits that are of a better quality. Additionally you can keep a look out more readily for spoiling pests and diseases.

According to gardening experts, bending the branches of apple trees increases the yield of fruit because the apple tree then makes less foliage and instead produces more fruit. But also the fruits are of better quality because the tree is effectively upside down; more liquid inside the tree reaches the fruits.

It is suggested to train your apple tree, that you tie weights to young branches. The weights might be half a brick or a plastic bottle filled with water. I didn’t fancy the prospect of attaching such unsightly things to my beautiful new apple tree so I thought up an alternative solution, which would look less intrusive – Apple tree weight pebbles!

I simply took a lovely big pebble; I have a few in the garden that we had collected from the beach with the kids when they were little. They were perfect, large weighty, and had been selected for they pleasant appearance.

I glued the pebbles onto clothes pegs with ‘No Nails’ glue and I left them to dry over night.

The following morning I pegged the ‘apple tree weights’ to the ends of the branches below the foliage, applying one pebble weight to each branch. Sure enough they pulled the branches downwards and hung there pleasantly.

Not only do the pebble apple tree weights look astatically pleasing, but they are also kind to the tree. There are two holes in the jaws of the clothes peg, and one is smaller than the other. I was able to select a hole for each branch they wouldn’t be a pinch fit for the tree. Obviously if it were a snug fit on the tree, the branch wouldn’t have room to allow the branch to grow and widen. A tight fit would also hinder the movement of sap down the branch and affect my apple crop, which certainly isn’t desirable.

Another advantage of the pebble apple tree weights is that when a branch has been trained and stays in position without need of the weight, I can simply un-peg it, and peg it to another branch very simply and easily.


Wednesday, 11 May 2011

Handmade Cards Project

This is a project card that I picked up at Hobbycraft which gives you project ideas for handmade cards.

If you click on the images they will open out bigger so that you can read them.


Perfect Valentines :: Tea Cosy Folk :: Santas Postbag::Halloween Mania :: Swindon Flowers ::Zafyna

Wednesday, 4 May 2011

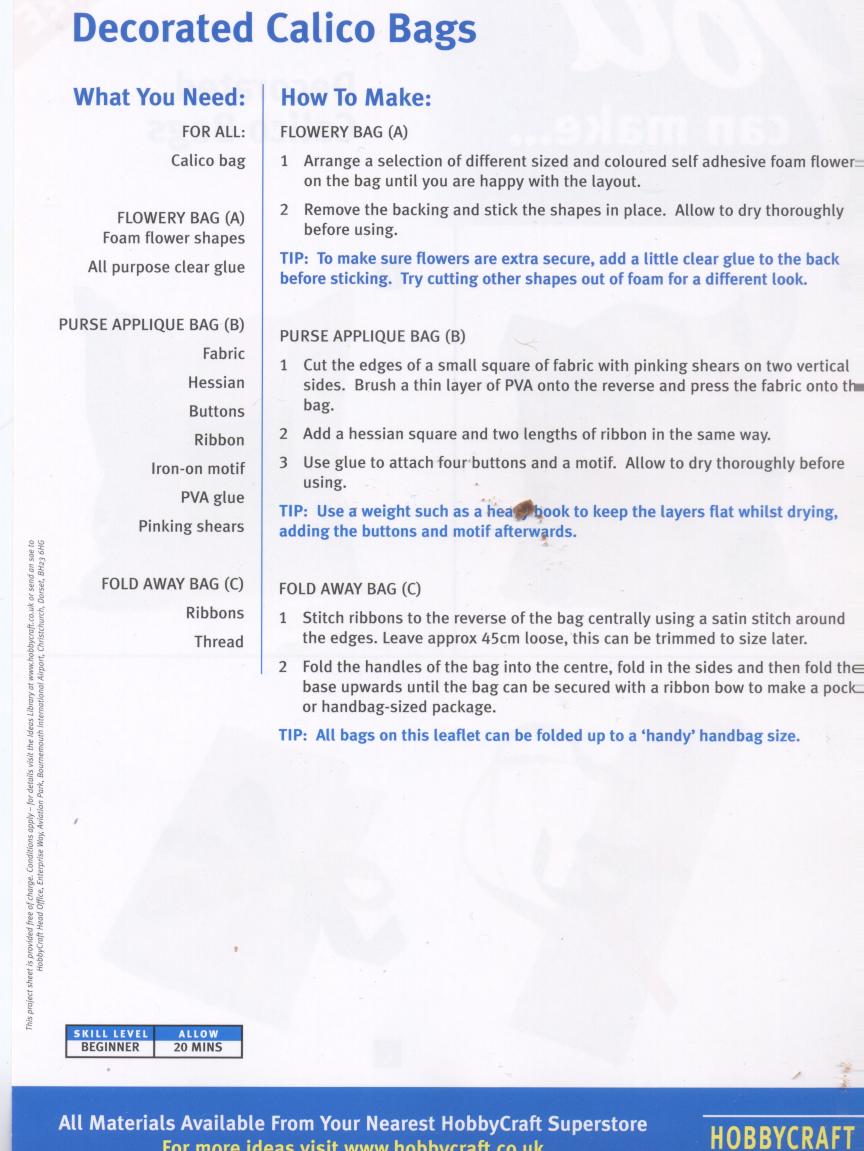
Making Fun and Trendy Shopping Bags

This is a craft project from Hobbycraft.

Get a simple plain shopping bag and add some decoration with fabric pens, appliqué, buttons and beads.

Click on the images below to make them big enough to read.

Saturday, 23 April 2011

Fixing Empire Line Dresses for the Bigger Bust

Fixing Empire Line Dresses for the Bigger BustIf you have a fuller bust, you will probably find that you have trouble with empire line dresses. Because your bust is more fuller than say a standard sized 14 dress would assume, your chest is visible between the areas of the dress that are supposed to cover your chest. The gap reveals your bra, and the more you move the more flesh becomes visible.

However, if you have a fuller bust these dresses are really flattering to your figure, and they keep you cool in the summer – what’s a girl to do?

I recently dreamt up this nifty little idea to solve this problem and its pants! Ladies wide lace panties to be precise, the ones that are made with just wide lace; you can pick up a pair for around £1.50 and Asda often do deals for 3 pairs for £5 so they are very inexpensive. Additionally, one pair will fix 2 dresses. What’s more, they come in a whole range of colours, so you are bound to find some that suit your dress perfectly. The lace of the pants is used to bridge the gap.

To get the lace in the right position, I find it’s better to put the dress on. Cut out the gusset from the pants, and cut up the side seams, this leaves you with a ‘V’ shaped piece. Now tuck the lace in the dress where you would like it to go. Try to get the seam or bow at the centre of the dress. The ‘V’ shape still allows you to show off a bit of cleavage if you desire.

Pin the lace into place from the front so that it holds whilst you take the dress off. You can always neaten up your pinning when the dress is off.

Then all you need to do is to sew the lace into place. I hand sewed then lace in with invisible stitches so that it didn’t show on the other side.

Because the lace has elasticised qualities I have also found that this also fixed cross over styles too as well as clothing made from jersey material.


Wednesday, 13 April 2011

Sew An Easy Shawl For An Elegant Gift In Less Than 30 Minutes

By Marian Lewis

There is no fitting required. It takes just a few stitches on your sewing machine. And, you need no sewing pattern.

Women of all ages love shawls from teens to senior citizens. Sew some for your favorite charity. Give the gift of something homemade.

Even if you know very little about sewing, you can make
quick and easy, elegant shawls in less than 30 minutes.

Whether for a dressy occasion or to ward off the chill from
your shoulders in a restaurant, you will want to sew several
of these shawls for yourself and to give as gifts to young
and old alike.

They are attractive and so popular now.

Make this triangular shawl from a square of fabric.

Here are five methods that you may use to make your shawl.

SUPPLIES:

Fabric:

1-1/2yards of 54" fabric
or
1-2/3 yards of 60" fabric.

Trim:

Trim the shawl with purchased fringe or beaded trim.

You will need:

3 yards of trim or fringe for the 54" square

or

3-1/3 yards of trim for a 60" square.

CONSTRUCTION:

Square the ends of your fabric.

METHOD 1

Trim the shawl with fringe.

Stitch fringe along 2 sides of the shawl 1/2" from the
edge on the right side of the fabric. Make sure the ends
of the fringe are towards the inside of the shawl.

To make the shawl:

1. Fold the square into a triangle with the right sides
together.

2. Pin and stitch through the same stitching that attached
the fringe to the fabric.

3. Leave an opening 3" to 4" along one edge.

4. Turn the shawl right side out through the opening.

5. Press well.

6. Slip stitch the opening closed.

METHOD 2

Finish with topstitching and no trim.

1. Fold the square into a triangle with the right sides
together.

2. Stitch a 1/2" seam on the two sides of the shawl leaving an
opening 3" to 4" along one edge.

3. Turn the shawl to the right side through the 3" opening.

4. Press well.

5. Slipstitch the opening closed.

6. Topstitch 3/8" from the two outer seamed edges.

METHOD 3

Outside stitched purchased trim

1. Stitch and turn the shawl as above.

2. Press well.

3. Topstitch purchased trim on the two outer seamed edges.

METHOD 4

Bias ruffle trim

1. Make a bias ruffle doubled the finished width desired plus
1" for two 1/2" seam allowances.

2. Cut the length double the length you need. (6 yards long for
a 54" shawl or 6-2/3yards long for a 60" shawl)

3. For a 3" wide finished ruffle, cut bias 7" wide.

4. Fold in half.

5. Baste stitch raw edges together 1/2" from the edges.

6. Pull up gathers to fit the shawl.

7. Stitch the ruffle to two edges of the shawl.

8. Sew on the ruffle the same as the fringe in METHOD 1.

METHOD 5

Make your own hand knotted fringe on a finished shawl.

1. Use embroidery floss or yarn.

2. Cut strands 9" long to make 4" long finished fringe.

3. Fold strands in half.

4. With a crochet hook, push a hole in about 1/2" from the
edge of the finished shawl.

5. Pull the 4 folds of yarn or floss through the fabric to the
right side forming a loop.

6. Then, bring the 8 ends through the loop.

7. Pull them away from the fabric until the loop lies flat.

8. Place loops close to each other all across the fabric.

9. Trim the cut ends of the fringe evenly.

10. Wear with loops showing.

To wear your shawl:

Wear your shawl with two ends tied on the inside at your
waistline in the back. It creates the look of a shrug and
will always stay in place.

Give gifts hand made with love!

These shawls are quick, easy, inexpensive and very much
appreciated by everyone!

Sew some shawls for loved ones, friends and your favorite
charity, too.

It just makes sense!

=-=-=-=-=-=-=-=-=-=-=-=

©2005 Marian Lewis - All Rights Reserved

1st Step To Sewing Success

Marian Lewis is a sewing instructor and the creator of an amazing new fitting method for hard-to-fit sewing folks.
In her ebook, "Common Sense Fitting Method For Hard-To-Fit Sewing Folks Who Want Great Fitting Skirts And Pants", find out step-by-step WHAT you really need, WHERE you really need it and HOW to apply that to a commercial sewing pattern.
For more information, go to: http://www.1ststeptosewingsuccess.com/fitting.html
Marian is also the author of other eBooks related to sewing including, "Sew A Tee Pee And Accessories For Your Tribe Of Kids" where she teaches basic sewing techniques while you have fun doing it!
To learn more, go to: http://www.1ststeptosewingsuccess.com/sewing.html
To discover sewing and fitting secrets to achieve sewing success, follow the link: http://www.1ststeptosewingsuccess.com


Wednesday, 6 April 2011

Jewelry Making Craft Ideas

By Rena Klingenberg

Jewelry making craft projects typically involve using jewelry supplies to make all sorts of items - some wearable, some useable, and some decorative. It's a fun way to use up bits and pieces of leftover supplies, or to mix other craft forms with jewelry techniques. If you're having a creativity block, have some fun using your supplies in a totally different kind of project.

Kids love jewelry making craft projects too. You can set out an assortment of beads, findings, colored art wire, ribbon, glue, and a few other odds and ends - and a group of creative children can happily entertain themselves for a couple of hours.

You can also make and sell kits for specific projects, and include photos of a few suggested ways to create the project using the supplies in the kit package. Jewelry making craft kits are popular gifts, and can sell well if you hit on currently cool projects and colors.

Jewelry Making Craft Ideas

Here are a few idea starters for projects you can experiment with. Many of these items make wonderful gifts, especially if you personalize the design for the person you give it to.

* Home decor - try using your jewelry supplies to embellish vases, create wall hangings, craft a bookmark, or make a wind chime.

* Baby gifts - make a dream-catcher to hang over baby's crib, or a sun-catcher to sparkle in the window.

* Clothing - use rhinestones or faux pearls to decorate a T-shirt, a pair of jeans, or a jacket. Make a belt buckle fancier with your jewelry making craft supplies.

* Handbags - embellish a cigar box into a purse with jeweled clasp, or crochet a beaded evening bag, or decorate a tote bag with beaded fringe and photo-charms of grandchildren.

* Shoes - make pretty shoe clips from wire and other items. Or add beads to the ends of tennis shoe laces.

* Gift packaging - use jewelry supplies to decorate a gift bag or create package ornaments.

* Holiday ornaments - design seasonal decorations small enough to hang on a tree, or large enough to hang on a door. Or give ordinary ornaments a makeover with jewelry making craft supplies.

* Party favors - make wine glass charms or coffee mug markers.

* Small gifts for anyone - create zipper pulls, cell phone charms, ceiling fan pulls, and key chains.

What Can You Use for Jewelry Making Craft Supplies?

In addition to your regular jewelry supplies and tools, here are some examples of other great crafty items to have on hand for your projects:

* A variety of glues.

* Fabric paint.

* Spray paint.

* Sharpie markers - wide tip and fine tip.

* Craft knife and cutting mat.

* Mod Podge.

* Bits and pieces of interesting paper and ephemera.

* Used postage stamps.

* Sponge brushes.

* Small paint brushes.

* Scrapbooking paper.

* Embossing powders.

* Ribbon, string, raffia, embroidery floss.

* Rubber stamps and ink.

After enjoying a few sessions of jewelry making craft projects, don't be surprised to find yourself crossing over into using craft materials in your jewelry designs. It opens up a whole new universe of addictive supplies and tools to collect!

Discover how to make earrings in crafty new ways, plus more ideas and inspirations for making jewelry, on Rena Klingenberg's Making Jewelry Now website.