Gather your hair together in a pony tail.
Put the pencil on top of the ponytail base with the nib to the right and wrap the tail up and around the end of the nib end of the pencil.
Next, twist the pencil around as though you are turning a cooker knob. The nib should pass over the top of the pony tail base.
Finally, you need to turn the pencil so that the nib is facing the starting point again, but instead of twisting, the nib needs to turn in towards the head and go through the base of the ponytail and out the other side.
It does take some practise to do, buy watch the video and try it yourself. It doesn’t take long to master, and it does hold your hair up really firmly and it doesn’t damage the hair like tight hair elastics can.
Once I had got the hang of tying my hair up a pencil, I wanted to find something nice to tie my hair up with. The Video suggest using a chopstick, a fork, and of course a pencil, this is great if you have nothing else to hand, but to wear your hair to go out in this style, you would look a bit kooky.
It is this that inspired me to make an alternative.
To make these hair ‘pencils’ you will need...
6mm Dowel Available cheaply at B&Q costing around 60p
Beads, ribbons and exciting things to decorate your pencil with.
Strong glue and sandpaper.
Cut the dowel into pencil length pieces at around 19cm.
Then with a Stanley knife cut the tip of the dowel as if you were sharpening a pencil, making sure that you are cutting away from your body. You want to shape the end to a blunt point. Then sand the point and the rest of the dowel so that it is smooth and wont pull on the hair as you push it into your hair style.
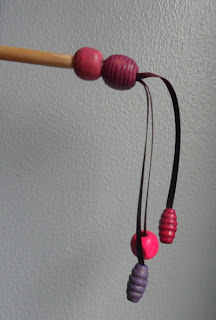
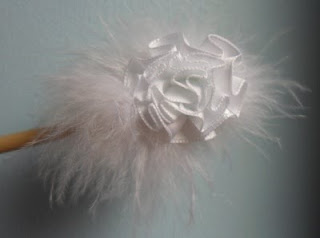
Next comes the fun part – decorating the end. I tried a couple of designs dangling beads, a bumble bee and ostrich feather and flower.
 To create the dangling beads I took lengths of thin ribbon, on one end of the ribbon I glued a small bead and the other ends of the ribbon I glued the ends altogether into a bigger bead. Next glue another bead onto the end of the stick, and then stick in place the bead filled with ribbon ends, and leave to dry.
When using beads, you may need to ‘sharpen’ the decorated end of the dowel to make it thin enough to feed beads onto.
 The bumble bee is simply two bead stuck onto the end of the dowel. I drew some stripes on the yellow bead with a black permanent marker pen and I glues on some wobbly eyes to give him a fun character. The bee’s wings are simply a piece of transparent silver ribbon folded into an ‘M’ shape. I then sewed a few running stitches along the bottom of the ‘M’ to hold the two ends and the central part together and to gather them. Then I put glue on the gathers and stuck on the bees back and left it to dry.
 The ostrich feathers are just a section of ostrich feathers wrapped around the end of the dowel and glued into place. I held it with a peg whilst the glue dried and then I stuck a ribbon rose on top of the feathers where the ends joined.
 The great thing about these hair accessories is that you can use anything to decorate them. One Idea I had was to get Hello Kitty danglies from the slot toy egg vending machines that you see in supermarkets. Hello Kitty hair accessories would be so cute.
Top Tip – I found that standing the pencils in a glass was great when leaving them to dry.


