Monday, 5 December 2011

Make a Wooden Shabby Chic Jewellery Tree

Make a Wooden Shabby Chic Jewellery Tree
The shabby chic jewellery tree is a hand made wooden tree that stores and shows off your earrings and necklaces. I painted this one in the shabby chic style, but you could just as easily paint the tree in gold or silver, or a funky hot pink.

The tree is easy to make and there is a handy template to draw around, simply click here to view the template.

To make the shabby chic jewellery tree you will need...

4mm MDF wood,
The template,
Wood glue,
Gold and cream paint,
Sand paper,
Clear varnish,
Some images of birds to decoupage the tree.

First print out the template and cut it out. The template is of half a tree. Draw around the tree onto the wood, and then flip the template over to draw the other half of the tree. You will also need to draw out the triangle templates on to the wood, these are the tree supports. You also need to make a base for the tree. I drew around a saucer with a shaped edge, but a circular saucer would be just as good.

Next you need to cut out the wooden pieces. I used an electric fret saw.

Once cut out, sand all the edges to make them smooth but don’t round off the edges.

On the template there the dots are shown, you need to drill holes at these points to hold the earrings. Once drilled, countersink each hole on both sides and sand off any untidiness.

Apply glue to the bottom trunk edge of the tree and stick it to the centre of the tree base. Apply glue to the two short edges of the tree supports and stick one at the centre front and one at the centre back of the tree. Leave to dry.

Apply 2 coats of gold paint to the edges of the branches on both sides of the tree.

Apply 2 coats of cream paint to the whole tree, supports and base.

When the cream paint is completely dry, lightly sand the edges of the tree to reveal the gold paint beneath. Do this on each edge of the tree on both sides.

Cut out the decoupage images, I chose birds and blossom. Arrange them in a pleasing way on both sides of the tree and glue in place with paper glue. And leave to dry.

Finally apply 2 coats of clear varnish to protect the paint work. Make sure that the varnish says on the time that it doesn’t have a yellowing finish; otherwise it will affect the colours of the finished tree.

Thursday, 1 December 2011

Snake Skin Scarf Knitting Pattern

Snake Skin Scarf Knitting Pattern

Knit yourself a cute snake scarf to wrap around your neck to keep you warm this winter. The snake scarf is great fun, and has a wiggly cable detail down his back. Knitted with chunky wool, makes this scarf a quick knit and an ideal quick present to knit for someone.

To knit the Snake scarf you will need...

200g or more of Wendy Pampas Mega Chunky wool in any colour you want your snake to be,
6mm knitting needles,
Cable needle,
20mm sew on wobbly eyes and some red satin ribbon for his tongue.

The knitting pattern for the snake skin scarf can be bought here...

Saturday, 26 November 2011

Comic Strip Nail Art

Comic strip nails! I used an archie comic book. you can also find comic strips to use in your local newspaper like charlie brown, garfield, dennis the menice, etc.


I found Comic Strip Nail Art on Youtube and thought it was a must try! I love the newspaper nails, and sheet music would look fab wouldn't it.

Tuesday, 22 November 2011

Decoupage Your Own Decor

Decoupage Your Own Decor
By Emily Chadwick

Decoupage is a true art form that's perfect for all of your home accessories and décor. This great arts and crafts project creates a complicated look that's not really all that complicated. Small pieces of cut out papers from magazines, tissue paper and even gold leaf can be used to layer decoupage into any design you like. After the pieces are attached to your favorite décor item, a few layers of decoupage lacquer are applied to the surface. This not only seals in the cutouts, it also makes it appear that the design is one smooth piece like a photo or drawing. Use this guide to decoupage and you'll be on your way to getting an affordable and adorable design on any home décor item in your home.

Prepping the Surface
Before you begin any decoupage project on your home accessories, you'll need to prep the area first. The area must be able to accept a glue to work. Plastic surfaces may need to be scuffed up with some light grain sandpaper to allow the glue to adhere correctly. Glass surfaces may need a quick acid etch with one part muriatic acid and four parts water. Acid etching is dangerous so use the correct safety equipment when handling this material.

Cutting out the Pattern
Materials like paper are easy enough to cut out and can be easily done with a regular pair of scissors. Paper conforms well enough to work with most decor and can easily wrap around round objects with ease. Stiffer materials like cardboard may need to be softened to bend around curved house décor.

Glue it Down
The medium that is used to glue down decoupage is as simple as it gets. Regular white Elmer's glue works great with most materials like wood or cloth. Some synthetic fabrics may require the use of special fabric glues. Wood glue can be used for most craft materials like ceramics, but some materials may require the use of special fixatives to provide a surface for the adhesive to bond to. Glue and place your decoupage materials on your favorite wall art and décor. Allow the materials to dry for 24-48 hours before applying a varnish. This way, if any decoupage materials peel away from the décor, you'll know you need a different adhesive.

Decoupage It
Once the paper is in place and your design looks good, it's time to cover it all up with a decoupage medium. A varnish or lacquer is commonly used to create the decoupage. Some decoupage materials are already premixed and ready to go. For a cheap alternative to store bought decoupage medium, wallpaper paste can work perfectly. Add several layers until the decoupage medium is flat and smooth across the décor. This may take many layers, so be patient and let each coat dry before applying another.

For all your home decor needs for all kinds of furnitures, check out Arcadian Home Decor.

Sunday, 13 November 2011

How to Make a Robin Nest Box

How to Make a Robin Nest Box
A great way to encourage a festive Christmas Robin into you garden is to provide a supply of meal worms, one of the robins favourite treats. You can also encourage robins by installing a nest box for them in your garden. Robin boxes are a bit different in style to the popular blue tit box, in that they are less enclosed. So you may already have a bird box in your garden, but if you want to provide a habitat for a robin, you need a robin friendly nesting box.

You can buy Robin Nest boxes online or at your local garden centre, they cost around ten to fifteen pounds. However, for the fraction of the price, you can make your own Robin box quite easily. It’s a great little project to make the box and it’s very rewarding when robins take up residence.

To make your Robin Nesting box you will need: Wood – a decking plank is ideal and only costs around 3 pounds, and screws.

You need to cut the decking plank into the following lengths-
26cm long for the back panel
15 cm for the roof panel
8 cm for the front panel
The base needs to be the same length as the planks width.
The 2 sides need to have a sloping top, the back edge should be 18cm and the front edge should be 13cm

Note: The two sides need to be cut out so that they are inverted if you are using a decking panel with a textured side.

When you have cut the wood out give it a light sanding to get rid of any rough edges or splinters. Don’t worry if your sawing isn’t perfect, the robins won’t mind about the rough and readiness of their new home, they’re not too house proud!

Follow the photo diagram to assemble the robin box.

How to Make a Robin Nest Box
Use a drill to pilot drill holes, and then screw in two screws through the bottom back into the edge of the base wood.

How to Make a Robin Nest Box
Then get the first side in place, screwing two screws up through the base wood and into the side. and then through the bas and into the side.


How to Make a Robin Nest Box
similarly, attach the other side to match.


How to Make a Robin Nest Box
with just two screws, attach the front panel to the bird box, screwing into the side panels.


How to Make a Robin Nest Box
Finally, screw the roof into place.

On the back panel that sticks up from the roof, you will need to drill a hole through the wood to mount the nesting box.

The great thing about making a robin box from decking planks is that the wood has already been treated so you don’t need to paint it. Having said that, if you do want to protect your nest box further, use a water-based preservative that won’t harm your feathery tenants.

Site nest boxes where birds won't be disturbed, away from prevailing winds, rain and the full glare of the sun. Make sure the box is 2m to 5m from the ground and there are no nearby footholds for predators.


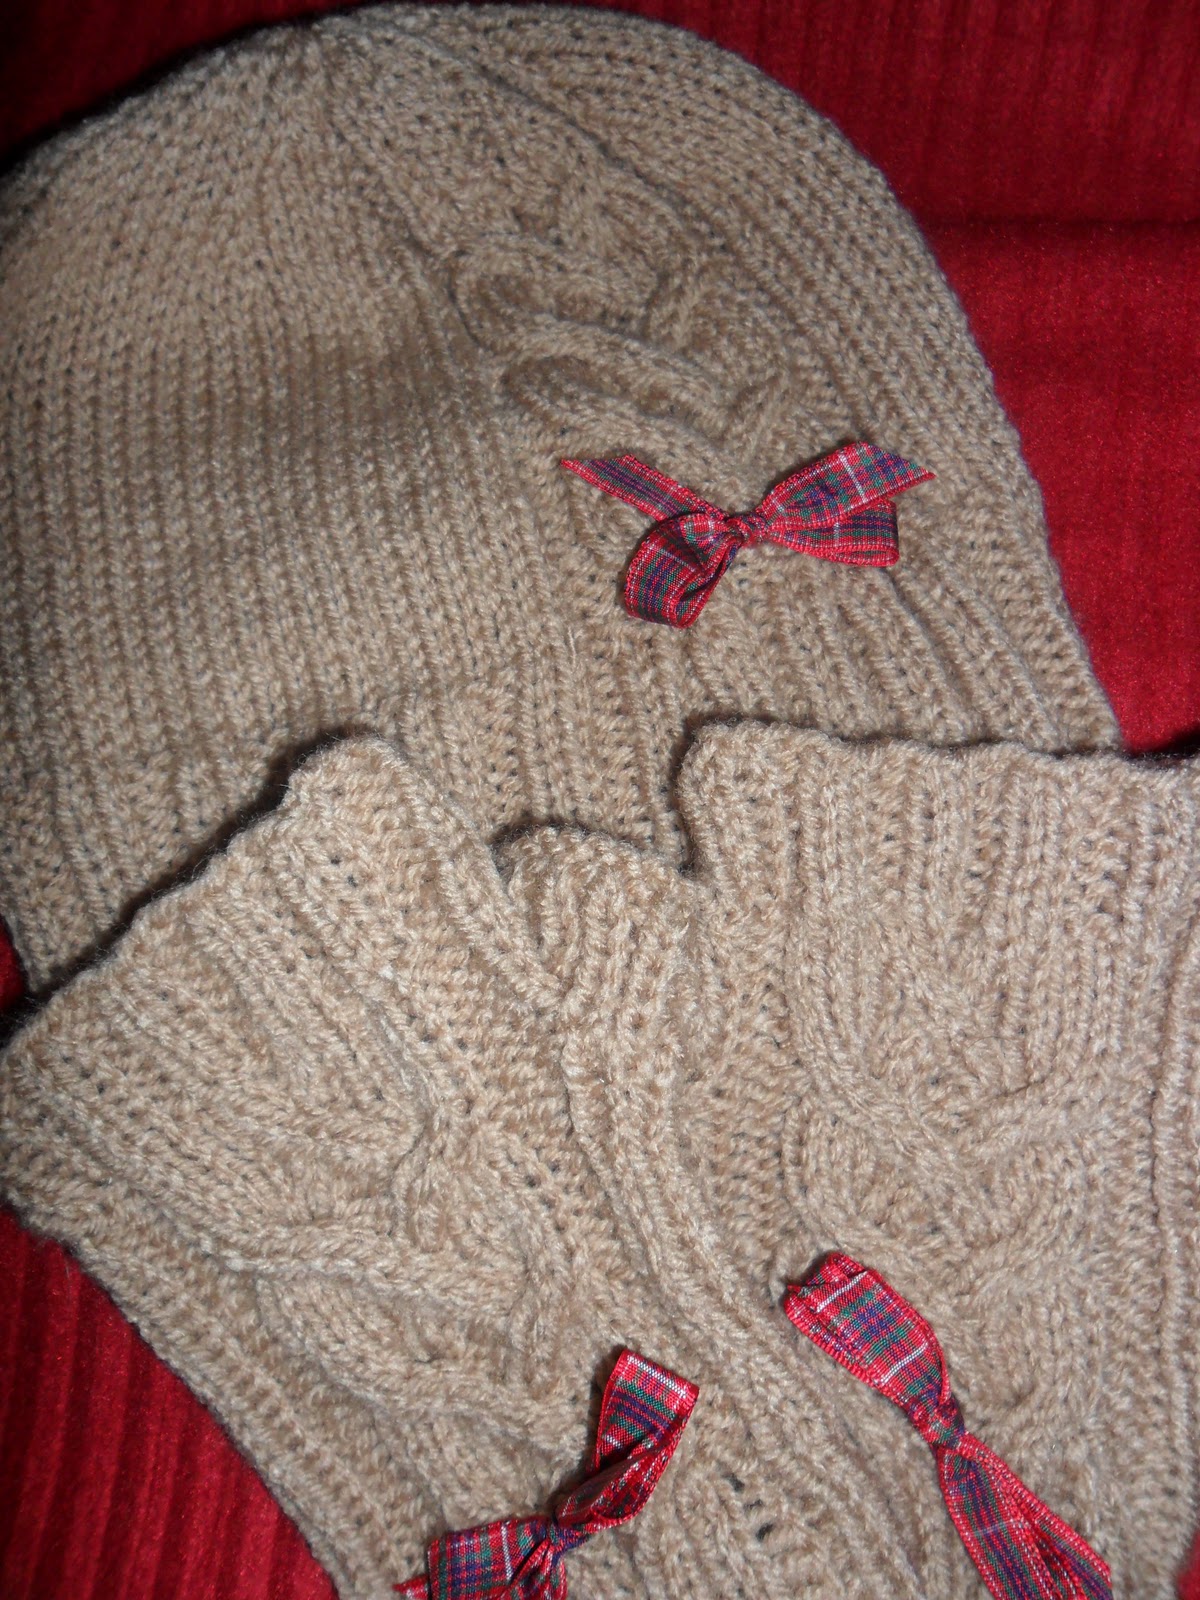
Woolly Hat Knitting Pattern to Match Michelle Szeghalmi's Evangeline Fingerless Gloves

Woolly Hat Knitting PatternI recently knitted a pair of Evangeline fingerless gloves designed by Michelle Szeghalmi. I found the gloves pattern free online. I had knitted a pair of elbow length gloves about a year ago for my daughter, and now I wanted to knit the short pair as a Christmas present for Nanna, but I also wanted to knit a hat to match. So here is the hat I knitted, incorporating the same pattern panel as in the gloves by Michelle Szeghalmi.

With the same wool as used for the gloves and on size UK number 7 needles cast on 88 stitches and work 14 rows double rib

*K2, P2* rep to end.

Then Knit 24, P2, work first row of Evangeline cable pattern, P2, Knit to end

Alternate rows, knit the knits and purl the purls.

Work three sets of the Evangeline pattern (32 rows in all) and then keeping the pattern as true as possible shape the top as follows.

Row 1: *K6, K2tog* to end

All alternate rows are purl.

Row 3: *K5, K2tog* to end
Row 5: *K4, K2tog* to end
Row 7: *K3, K2tog* to end
Row 9: *K2, K2tog* to end
Row 11: *K1, K2tog* to end
Row 13: *K2tog* to end
Row 15: *K6, K2tog* to end

Thread the yarn through the remaining stitches and draw up and finish off. Sew down the back seam of the hat with fight sides facing.

Finally I threaded a small length of ribbon through the knitting at the bottom, centre of the first pattern row and tied a bow.


Monday, 24 October 2011

Teenage Mutant Ninja Turtles Knitting Pattern to Knit Action Heros

Teenage Mutant Ninja Turtles Knitting Pattern to Knit Action Heros

Want to knit yourself (or someone else) some retro action figures? My Daughter as big as she is, still adores the Teenage Mutant Ninja Turtles, so I designed a knitting pattern to make soft knitted replicas of hero’s in a half shell – Turtle Power!

To make these retro action dolls you need...
Double knitting wool in shades: Emerald Green, Lime Green, Dark Green, Tan, Red, Blue, Purple and Orange.
You also need size 10 UK needles,
Kapok stuffing,
And sew on wobbly eyes or safety eyes if your toys are for a younger child.

Each doll measures approx 19 cm

You can buy the pattern to make the turtles here...