Sunday, 3 October 2010

How to Make a Quill Biro Pen

How to Make a Quill Biro Pen
Quill pens are great fun to write with, but not completely practical with the ink pot and the problems with ink dripping and blotting. Thank goodness for twentieth century biro style pens, they eliminate all that messiness, but do lack that je ne sais quoi.

Making a quill pen from a feather and a biro pen is quick and easy to do, and also much more cost effective than buying a ready made quill pen.

All you need to make your quill pen is…

Some large feathers, one for each pen. You will find packets of feathers in most craft shops. They usually have both dyed feathers in vibrant colours as well as natural looking feathers. Choose feathers with quite a big shaft, because this has to be big enough to house the biro.

You also will been a biro pen for each quill and you will need a bamboo skewer to use as a tool.

First take a feather and cut off the end of the shaft at the writing end. The cut needs to expose the hollow cross section of the feather, and be a large enough hole to slot the bamboo skewer up. Push the skewer up inside the feather as far as you can, and then pull it back out again.

Next take the biro pen, and take it to pieces. All you need is the plastic tube part that holds the ink and the nib. Discard the casing of the pen.

If you take a look at the plastic tubing on the pen, its probably not filled to the end with ink. Snip of the surplus tubing so the plastic is just a couple of centimetres away for the ink line.

Push the ink filled plastic tub up into the feather so that only the nib of the pen is showing; the rest of the biro should be in the feather shaft. If you can not push the pen up into the feather this far, you need to repeat the procedure with the bamboo skewer and try to push it in deeper.

Once you are happy that the biro is snug inside the feather, you can add a small amount of glue just to keep it securely in place. You quill pen is now ready to use, However, you could make the pen more glamorous buy tying a ribbon around the shaft or maybe you could add some glitter to the feather.

Quill pens make a great gift for people who like writing and can be given in a long slender box, or can be given with a notebook or diary.


Sunday, 26 September 2010

A Homemade Medieval Circlet Can Really Finish a Medieval Costume

A Homemade Medieval Circlet Can Really Finish a Medieval Costume
If you need something to adorn your head to finish your medieval or renaissance costume, you could make yourself a fabric medieval circlet. A medieval circlet is a hoop shaped ‘crown’ that sits on the head and can be worn with or without a veil. If you are making a fabric medieval circlet, you can tailor make it to compliment the rest of your costume. If you have made your dress, you would use left over fabric to make the circlet.

To make a Fabric Medieval Circlet you will need…

Some Fabric,
Soft toy stuffing,
Ribbon, lace beads or contracting fabric to decorate.

First you need to cut out the fabric that will form the main part of the circlet. If you are making the circlet for someone you know, you can measure their head to make the correct size. Otherwise cut a rectangle of material that is 60cm long and about 6cm wide. The width is your own personal preference, and you can make the circlet chunkier or thinner if you prefer.

Fold the strip in half lengthways with the right sides of the fabric together. Sew along the length edge and turn right sides out.

Lightly stuff the ‘tube’ with some toy stuffing. Try not to make it lumpy. Fold the end bits of fabric in to cover over the ends.

With the seam on the inside, bring the two tube ends round to meet one another and sew them together to form a hoop. Try to keep the stitches small and discreet, but don’t worry about them too much because they can be hidden under ribbon.

At the seam that you have just stitched (the back of the circlet) anchor a length of ribbon with a couple of stitches. Now wrap the ribbon evenly around the circlet to give a candy stripe look. Tack the end of the ribbon to the back of circlet. Then cut a couple of lengths of ribbons to tack to the back of the circlet. Tie a bow in one of the lengths of ribbon and sew this in place on top of the other tacked ribbons.

Add a veil to the circlet by simply taking a rectangle of organza, edge the organza with ribbon and then gather the top edge with a row of running stitches. Sew the gathers to the back inside edge of the circlet.


Wednesday, 22 September 2010

How to Make a Medieval Headdress

How to Make a Medieval HeaddressAccessories always make a costume look special, and what medieval lady would be without some sort of head gear? This is an easy to make medieval headdress that can be made from left over scraps of material – Great if you have made your own dress, you can use the off cuts to make a matching hat.

To make this medieval headdress you will need…
Scraps of contracting material,
A plain plastic head band,
A clear plastic bottle without ridges,
Some organza – embroidered, sparkly, or diamonte can add more glamour.
Glue
And ribbon and beads to decorate.

You need to make yourself a pattern first on plain paper it will be a rectangle. Measure the out side of the hair band from where the teeth start to where they end. This is usually the right place for the top of the headdress to come around to. This is the length of the rectangle. The width is a matter of choice; you could have a look in the mirror and choose a width. Around 5.5cm is good.

Cut out two pieces of material using your pattern. Cut the material slightly bigger than the pattern to give yourself a seam allowance.

With right sides of the fabric together sew along the two width sides and one of the length sides. Turn right sides out.

Using your pattern again cut out a piece of clear plastic from the bottle. The plastic should be slightly smaller than the pattern. Insert the plastic into the ‘pocket’ you have just sewn. Work with the curl in the plastic, so that when you come to attach the headdress to the hair band, the curve goes the right way. Use a spot of glue to hold the plastic in place.

To make the veil, cut the organza double the length of the pattern and cut it to the length you require. Again this is personal taste. But for around shoulder length, cut to about 50cm. Round the corners on what will be the bottom edge. Edge the sides and bottom of the organza with ribbon.

Along the top edge of the organza, sew a row of running stitches and slightly gather up. Pin the gathered organza, to the pocket opening. You need to make sure that you have the top side of the pocket, and that you pin the right sides together, so that the raw edges of the organza and the pocket material are lined up. Add a couple of extra gathers at the two ends. Sew across the gathers.

Turn the raw edges of the pocket and the organza inside towards the plastic, leaving enough room to sew the opening closed. Sew across the opening.

Using glue, stick the plastic hair band to the inside of the headdress making sure that the fabric part is in the centre. It should start at the teeth on one side and end where the teeth end on the other side.

The hair band should be about 0.5 cms back from the front edge of the fabric part.

Use pegs to hold the hair band in place whilst the glue dries.

Sew a row of beads over the stitching when you closed the pocket. This covers up the sewing and embellishes the headdress.


How To Make Stepping Stones From Concrete

How To Make Stepping Stones From ConcreteBy C A Larson

It's really fun to make stepping stones for your garden. It's easy too. There aren't very many materials you will need to make simple stepping stones so it's an inexpensive way to add a unique character to your walkway.

Here are the supplies you need to have for your stepping stone project: a bag of sand mix, a plastic tub to mix it in, a trowel, something to make the form, and some WD-40 or a similar product.

Here is an important safety tip. The dust from the sand mix contains cement. The cement mixes with water to form a hard, stone-like product. So don't breathe it! Use a face mask or tie a bandana over your nose and mouth while the dust is in the air.

Another tip: Don't wash it down your drain. It may harden there and become a nightmare to repair. Always wash off your tools, hands, shoes, and everything else outside.

First thing: Have your stepping stone form ready. You can make a form from anything. I like to use wood and screw it together in the various sizes I want. You could use any material you find but make sure you can take it apart or someway get the finished stepping stone out of it easily.
Once you have the stepping stone form made, spray the wood with WD-40. This will make certain the concrete doesn't stick to the form making it easier to take it out. Put a piece of heavy plastic on a work board - ½ inch plywood is good - then the form on the plastic. Now you can move it around once you have it full of cement.

Follow the directions on the Sand Mix package to mix it. You want the concrete to be the consistency between peanut butter and cake batter. If you don't know what cake batter is like, think of ceiling paint. They are both too thin while peanut butter is too thick. Add more water or more sand mix to get this right.

Fill your form, give it a few jiggles to get the air bubbles out, and wait a few minutes for the water to form on top. Once the water evaporates, or you mop it up with a paper towel, you can make your design on the top surface of the stepping stone. I like to use the flat back of a trowel to make some shallow swirls.

There are so many ways to finish your stepping stone. You could embed some colorful stones into the top surface or you could write a nice phrase in it. You could even paint it. Once all the water has evaporated, cover your stepping stone with plastic and let it harden until the next day.
C. A. Larson teaches how to do all sorts of projects. He also has the On Sale Blog to help you find good deals for the supplies and tools we all need.

Tie Dye T-Shirts at Home With Your Kids - Great Summer Craft Activity

Tie Dye T-Shirts at Home With Your Kids - Great Summer Craft Activity
By Paula H Atwell

One of the most fun outdoor arts and craft activities to do with your kids during the summer is the art of tie dying t-shirts, pillowcases, socks, and any other clothing or accessories you have that can use some extra color and excitement.

You do not have to be an expert artist or an artist at all to tie dye t-shirts this summer. It is not an expensive craft to do at home, and when you are done, you will have an art project that you can wear proudly, and will last for a very long time, or at least until your kids outgrow the clothes they are wearing this summer. You can find dye kits in any fabric or craft store, or you can buy them online. However, you can also put a dye kit together yourself from some simple ingredients.

Tie dye is actually a very simple process. Once you have selected the material you want to dye, you should wash it to get out any chemical coatings that may be left on from the manufacturer. You can also tie dye old used clothing to brighten it up. White is the best color to dye on, but you can use any light color. The concept behind tie dying is easy to understand. Using rubber bands or string, you bunch up the material and "tie" it. The areas that are tied will not allow any dye to penetrate, therefore you are left with white areas. This is the essence of tie dye. However, there are many patterns that can be created by using the tie dye method. The most traditional pattern is the circle which is formed by grabbing material in the center of the t-shirt, and tying the string around the pulled material. You can form other patterns by folding material then tying it, pleating the material and tying it, or creating scallop shapes and tying it. The more you tie dye, the better you will get and finding new patterns. But even the very first time, you will get excellent results.

You can use as many colors as you want when you tie dye, but if you try to apply every color in the same spot, you may end up with a mud colored shirt. So it is best if you try to plan which colors you will use before you put them all on your shirt. No matter what colors you choose, they will always look darker when wet, so do not be surprised when your shirt dries lighter in color.

Tie dye is a messy project, best done outdoors over a grassy area that can use the extra moisture. You will need very few items to complete your project--just some water, plastic tubs or bins, gloves to protect your hands, white clothing for dying, and the dye. Most tie dye kits supply everything you need except the water and clothing.

Most people use either a squirt bottle or just dip their clothing to apply the dye, however if you want more detail then you can use a paint brush to apply the dye. Whatever you do, just follow the instructions on the dye box to affix the dye, and prepare the clothing to wear. After you are finished, you and your kids will have new clothes to wear all summer long.

I am the owner of Lake Erie Artists Gallery at Shaker Square in Cleveland Ohio and the author of Artist Reviews. Tie dye is a project that I do just about every summer with my own girls. If you are looking for a great tie dye kit to use this summer, take a look at the review I have done for Jacquard Products Tie Dye Kit.

Wednesday, 15 September 2010

Get Ready for Halloween - Spooky Torch Light Display

Halloween Torch Light Projector
Turn an everyday torch into a spooky light projector and create a Halloween theme light display on the wall. You could even make up a little story and put on a performance for your friends and family.

To make a spooky Halloween torch projector you will need...

A torch, some paper, scissors, pencil, and double-sided sticky tape.

Draw around the 'light end' of the torch with a pencil. This is the amount of space you have to draw an image to project onto the wall.

Draw an image in the circle. You could draw a witch, a bat, a skull, a pumpkin, a spider, or a ghost, anything you like, but try to keep the image simple.

Cut out the image.
Halloween Torch Light Projector

Using double-sided sticky tape, stick the cut out image on to the 'light end' of the torch.

Now you are ready to try it out.

Turn out all the lights, and switch the torch on, and shine it onto a wall. You will see the image that you cut out projected onto the wall. The further away you get from the wall the bigger the image gets.

It's great spooky fun!


Wednesday, 8 September 2010

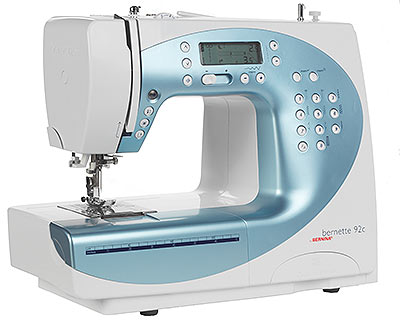
Buying an Electric Sewing Machine - How to Pick the Perfect One

Buying an Electric Sewing Machine - How to Pick the Perfect One
By Analyn Encabo

If you're interested in buying an electric sewing machine, then there are several key points that you need to remember. After all, this is a monetary investment you're making, so you need to understand the ins and outs of making this kind of purchase. There are several different kinds of machines available on the market today, and an electric sewing machine is one of the most popular ones.

The first thing you must decide is how you will use the sewing machine. Will it be used for making quilts and blankets, for instance? Will you be using it to make your own clothing? No matter what the reason, certain machines are designed for certain purposes. This means that you need to choose the right kind of sewing equipment for the way you are planning to use it. Also, make sure that you take advantage of the space you have available. If you have a tiny corner of the room, you need to take that into consideration when you choose the size of the new machine. You might decide that you can't fit an electric sewing machine there, so you might look at a more compact model.

You also want to decide what your budget will be for your new machine. Check around online to get an idea of the different price ranges at the time. Make sure you decide how much you're able to spend and stick with it! You can buy many different types of machines for a variety of price ranges from under $100 all the way up to over $5000. Make sure that you stick to your budget so that you do not feel guilty for purchasing a sewing machine that was above your means.

Finally, you want to do some research on the brands and models available on the market. Check Google to find out the right kind of machine for your needs and then you can do some price comparisons. Ensure that you compare the features side by side as well as the prices. Also read any customer reviews available online about the electric sewing machine you are interested in buying. This will tell you what other buyers thought once they were able to use the item at home.

There is nothing more fun than to create your own dresses or other garments from scratch. Your family will look a million dollars in your new creations whether they be shirts or dresses. You can also create curtains, table clothes, sheets, covers for the couch literally anything you can think of. Your electric sewing machine will soon be your new best friend.

A great place to save money and start your research is at our site Electric Sewing Machine.
Here we give you some further tips and save you stacks of time. You can research all the top brands in the one place, so click the link and check out your next Electric Sewing Machine.