Wednesday, 22 September 2010

How To Make Stepping Stones From Concrete

How To Make Stepping Stones From ConcreteBy C A Larson

It's really fun to make stepping stones for your garden. It's easy too. There aren't very many materials you will need to make simple stepping stones so it's an inexpensive way to add a unique character to your walkway.

Here are the supplies you need to have for your stepping stone project: a bag of sand mix, a plastic tub to mix it in, a trowel, something to make the form, and some WD-40 or a similar product.

Here is an important safety tip. The dust from the sand mix contains cement. The cement mixes with water to form a hard, stone-like product. So don't breathe it! Use a face mask or tie a bandana over your nose and mouth while the dust is in the air.

Another tip: Don't wash it down your drain. It may harden there and become a nightmare to repair. Always wash off your tools, hands, shoes, and everything else outside.

First thing: Have your stepping stone form ready. You can make a form from anything. I like to use wood and screw it together in the various sizes I want. You could use any material you find but make sure you can take it apart or someway get the finished stepping stone out of it easily.
Once you have the stepping stone form made, spray the wood with WD-40. This will make certain the concrete doesn't stick to the form making it easier to take it out. Put a piece of heavy plastic on a work board - ½ inch plywood is good - then the form on the plastic. Now you can move it around once you have it full of cement.

Follow the directions on the Sand Mix package to mix it. You want the concrete to be the consistency between peanut butter and cake batter. If you don't know what cake batter is like, think of ceiling paint. They are both too thin while peanut butter is too thick. Add more water or more sand mix to get this right.

Fill your form, give it a few jiggles to get the air bubbles out, and wait a few minutes for the water to form on top. Once the water evaporates, or you mop it up with a paper towel, you can make your design on the top surface of the stepping stone. I like to use the flat back of a trowel to make some shallow swirls.

There are so many ways to finish your stepping stone. You could embed some colorful stones into the top surface or you could write a nice phrase in it. You could even paint it. Once all the water has evaporated, cover your stepping stone with plastic and let it harden until the next day.
C. A. Larson teaches how to do all sorts of projects. He also has the On Sale Blog to help you find good deals for the supplies and tools we all need.

Tie Dye T-Shirts at Home With Your Kids - Great Summer Craft Activity

Tie Dye T-Shirts at Home With Your Kids - Great Summer Craft Activity
By Paula H Atwell

One of the most fun outdoor arts and craft activities to do with your kids during the summer is the art of tie dying t-shirts, pillowcases, socks, and any other clothing or accessories you have that can use some extra color and excitement.

You do not have to be an expert artist or an artist at all to tie dye t-shirts this summer. It is not an expensive craft to do at home, and when you are done, you will have an art project that you can wear proudly, and will last for a very long time, or at least until your kids outgrow the clothes they are wearing this summer. You can find dye kits in any fabric or craft store, or you can buy them online. However, you can also put a dye kit together yourself from some simple ingredients.

Tie dye is actually a very simple process. Once you have selected the material you want to dye, you should wash it to get out any chemical coatings that may be left on from the manufacturer. You can also tie dye old used clothing to brighten it up. White is the best color to dye on, but you can use any light color. The concept behind tie dying is easy to understand. Using rubber bands or string, you bunch up the material and "tie" it. The areas that are tied will not allow any dye to penetrate, therefore you are left with white areas. This is the essence of tie dye. However, there are many patterns that can be created by using the tie dye method. The most traditional pattern is the circle which is formed by grabbing material in the center of the t-shirt, and tying the string around the pulled material. You can form other patterns by folding material then tying it, pleating the material and tying it, or creating scallop shapes and tying it. The more you tie dye, the better you will get and finding new patterns. But even the very first time, you will get excellent results.

You can use as many colors as you want when you tie dye, but if you try to apply every color in the same spot, you may end up with a mud colored shirt. So it is best if you try to plan which colors you will use before you put them all on your shirt. No matter what colors you choose, they will always look darker when wet, so do not be surprised when your shirt dries lighter in color.

Tie dye is a messy project, best done outdoors over a grassy area that can use the extra moisture. You will need very few items to complete your project--just some water, plastic tubs or bins, gloves to protect your hands, white clothing for dying, and the dye. Most tie dye kits supply everything you need except the water and clothing.

Most people use either a squirt bottle or just dip their clothing to apply the dye, however if you want more detail then you can use a paint brush to apply the dye. Whatever you do, just follow the instructions on the dye box to affix the dye, and prepare the clothing to wear. After you are finished, you and your kids will have new clothes to wear all summer long.

I am the owner of Lake Erie Artists Gallery at Shaker Square in Cleveland Ohio and the author of Artist Reviews. Tie dye is a project that I do just about every summer with my own girls. If you are looking for a great tie dye kit to use this summer, take a look at the review I have done for Jacquard Products Tie Dye Kit.

Wednesday, 15 September 2010

Get Ready for Halloween - Spooky Torch Light Display

Halloween Torch Light Projector
Turn an everyday torch into a spooky light projector and create a Halloween theme light display on the wall. You could even make up a little story and put on a performance for your friends and family.

To make a spooky Halloween torch projector you will need...

A torch, some paper, scissors, pencil, and double-sided sticky tape.

Draw around the 'light end' of the torch with a pencil. This is the amount of space you have to draw an image to project onto the wall.

Draw an image in the circle. You could draw a witch, a bat, a skull, a pumpkin, a spider, or a ghost, anything you like, but try to keep the image simple.

Cut out the image.
Halloween Torch Light Projector

Using double-sided sticky tape, stick the cut out image on to the 'light end' of the torch.

Now you are ready to try it out.

Turn out all the lights, and switch the torch on, and shine it onto a wall. You will see the image that you cut out projected onto the wall. The further away you get from the wall the bigger the image gets.

It's great spooky fun!


Wednesday, 8 September 2010

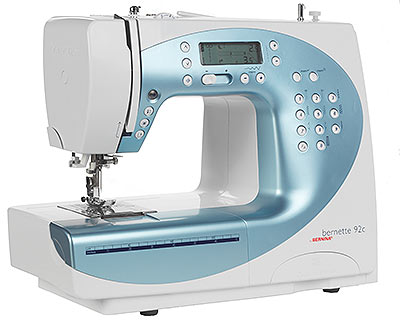
Buying an Electric Sewing Machine - How to Pick the Perfect One

Buying an Electric Sewing Machine - How to Pick the Perfect One
By Analyn Encabo

If you're interested in buying an electric sewing machine, then there are several key points that you need to remember. After all, this is a monetary investment you're making, so you need to understand the ins and outs of making this kind of purchase. There are several different kinds of machines available on the market today, and an electric sewing machine is one of the most popular ones.

The first thing you must decide is how you will use the sewing machine. Will it be used for making quilts and blankets, for instance? Will you be using it to make your own clothing? No matter what the reason, certain machines are designed for certain purposes. This means that you need to choose the right kind of sewing equipment for the way you are planning to use it. Also, make sure that you take advantage of the space you have available. If you have a tiny corner of the room, you need to take that into consideration when you choose the size of the new machine. You might decide that you can't fit an electric sewing machine there, so you might look at a more compact model.

You also want to decide what your budget will be for your new machine. Check around online to get an idea of the different price ranges at the time. Make sure you decide how much you're able to spend and stick with it! You can buy many different types of machines for a variety of price ranges from under $100 all the way up to over $5000. Make sure that you stick to your budget so that you do not feel guilty for purchasing a sewing machine that was above your means.

Finally, you want to do some research on the brands and models available on the market. Check Google to find out the right kind of machine for your needs and then you can do some price comparisons. Ensure that you compare the features side by side as well as the prices. Also read any customer reviews available online about the electric sewing machine you are interested in buying. This will tell you what other buyers thought once they were able to use the item at home.

There is nothing more fun than to create your own dresses or other garments from scratch. Your family will look a million dollars in your new creations whether they be shirts or dresses. You can also create curtains, table clothes, sheets, covers for the couch literally anything you can think of. Your electric sewing machine will soon be your new best friend.

A great place to save money and start your research is at our site Electric Sewing Machine.
Here we give you some further tips and save you stacks of time. You can research all the top brands in the one place, so click the link and check out your next Electric Sewing Machine.


Frothing Soda Can Trick

Frothing Soda Can TrickThis Halloween trick does take time to prepare, but gives the people who don't give candy cause to fret thinking that someone has left them a messy trick. The cans look like the contents are fizzing out at first glance on a dark Halloween night, but actually it's a cleverly made stage prop.

The Frothing soda cans need to be made a day or two in advance of Halloween and younger kids my need help from a grown-up with the expandable foam.

To make a fizzing can Halloween trick you will need...
Some empty drinks cans that formerly contained a fizzy drink,
A tin of Expanding Foam,
And a few old plastic carrier bags.

First you need to rinse the cans to remove any sticky residue. Shake them dry. There's no need to dry them properly and the foam needs the surface to be wet. If you want to add some dents to the can, this can add a bit more realism to the finished prop.

You need to decide if your tin can will be lying down and foaming or if it is going to be stood upright. Spread out a carrier bag on a table to protect it from the foam, and place you can on the bag, either stood up or laying down.

Follow the instructions on the can to set up the nozzle on the expanding foam, and shake well.

Then insert the nozzle into the soda can and spray the foam in. You're not trying to fill the can, but to simply give the foam some anchorage on the inside of the can. Whilst still spraying, let the nozzle come out of the can and foam down the side, or around in front.

Remember less is more - the foam expands. Even a small amount of foam will expand into a larger amount of foam. If you over do it, it looses its realistic look.

Leave the can for a couple of hours to form a hardened skin. When you feel able, pick up the can and carefully peel off the carrier bag from the foam and leave upside down to dry the underside.

Leave the prop to one side for 24 hours to completely dry.

Hide the trick in the bottom of your Halloween goody bag. This keeps it hidden from people who you want to play tricks on, and it means that you have it with you ready for action for those Halloween party poopers.


Wednesday, 1 September 2010

Herb Garden Design - How to Make a Herb Spiral

Herb Garden Design - How to Make a Herb SpiralBy John Beaver

When you are thinking about herb garden design, but realise that your yard will only accommodate a very small area for herbs, and yet you are keen to grow a wide variety to complete your herb garden delights, there is a way to maximise your growing space in a small plot. That is by designing a herb spiral.

A herb spiral is simply a way to introduce herbs into your kitchen garden in a small space, with a spiral of bricks or large stones or any ornamental building material which encloses a heap of soil up to two metres wide, and about a metre or so high.

Basically the idea behind this concept is to provide space for as many different herbs as possible in a restricted area. The shape of the spiral and the height differences that you create provides different environments which you could not obtain in a level small space.

Your finished spiral does not have to form a circle but it is neater and easier to work in than an oval shape. After all the idea is that you can easily reach to the centre of the completed spiral for planting, pruning and harvesting. Where you actually site your spiral will be a matter of your own choice, but if you intend to concentrate on culinary herbs then as close as possible to your kitchen is the ideal. Just remember that you will need a bright sunny position.

The materials that you are needing, besides the wall brick or stones, will be small pebbles, pea shingle, course sand, a non peat compost as your growing medium, some fairly thick cardboard or a supply of newspaper, some composted organic material and some ordinary garden soil.

First of all you need to practise drawing a spiral to scale of 1mm= 1cm. Put four dots as points of a diamond 200mm apart on your paper. Inside each dot place another dot 50mm away and then one more dot in the centre, which will of course be a further 50mm inside all the second layer of dots. Now starting at the top dot, draw your spiral by joining the dots keeping your line 50mm apart as you progress round and round. Having practised this on paper you should have no difficulty doing the real outline on the garden plot using cm instead of mm.

Line the outer ring of the spiral with the cardboard or newspapers to stop weeds coming up. Lay out the outer ring to the fourth dot with your building material (two layers if using house bricks) but gradually raising the level to 50cm and infill to quarter height with garden soil. On top of that goes a 10cm layer of the composted organic material topped off with a layer of pebbles, a layer of pea shingle and a layer of course sand. Leaving about 15cm unfilled at the top.

While filling in, continue to place the inner ring of building material as far as the eighth dot gradually raising the level until you are about a metre high. Finally complete the spiral by continuing level, build round to the centre dot and finish infilling as described. You should now have a gently rising spiral of sand which needs to be topped with about 15cm of your growing medium.

As a design refinement you could make a small pond at the outer end of the spiral. Just dig a hole and line it with a suitable waterproof material, creating a swamp area at the outer edges. If you have electric power available you could install a pump in a suitable pond and have a misting spray coming out of the middle of your spiral. You will naturally have to lay the necessary piping before you start laying your spiral, and of course keep the pond topped up with water; but you did not need me to remind you of that.

My name is John and I've been interested in growing and using herbs for longer than I care to think about. Having carried out a great deal of research on the subject I've now compiled a huge amount of knowledge which I would like to share. To see more great information about herb garden design, please visit my website where there is so much more information generally about herb gardening. Also you will find there are details of a free herb gardening mini-course that I have prepared for you, at: http://www.herbgardendelights.com. I must apologise to anyone who wanted to access my website early in January because it was out of action due to a malfunction. Everything is now working properly. If you were to Google "John Beaver" you will find there are hundreds of us out there, but I am the one on the first page listed for EzineArticles. So if you have missed any previous article you can find them all listed there.


Fish Quilt Pattern - How to Choose the Right Pattern

Fish Quilt Pattern - How to Choose the Right Pattern
By Cathy Thomas

How to Choose the Right Pattern and Fabrics for Your Fish Quilt...


Let me walk you through the process of how I created my fish quilt pattern and how you can find or create a pattern that will be right for you. The process of creating a beautiful quilt starts with finding the right pattern. To do this, ask yourself why you are making the quilt. Is it to hang on the wall? Is it for a bedspread? Or is it going to be a gift for a friend or family member? Whatever the case may be, your reason is the first step in helping you determine a pattern that is right for you.

Once you have your reason, visit your local quilt shop and look for a fish quilt pattern that matches the picture in your head. Oftentimes, shop owners or workers will be more than happy to assist you and help you find a pattern to match your needs and skill level. However, if your local quilt store does not have what you want, many women are going online to find what they need. By simply doing a search, you can find lots of different quilt stores or pattern shops that will have just what you need.

Once you have your fish quilt pattern selected, you now get to look for fabrics. This part can often be hard for quilters as they have a difficult time imagining how certain fabrics and colors will change the look and feel of the quilt pattern. Here are a few suggestions to keep in mind.

First, when considering the tone and color of your fabrics, remember that warmer colors such as reds, oranges, and yellows appear closer, while cooler colors appear further away. By choosing how you integrate colors, you can create depth on your quilt.

Second, consider what effect you want your quilt to have on those who use it or see it hanging on the wall. Warmers colors illicit excitement and hightened levels of alertness. Cool colors have a very calming and soothing effect.

As you consider these variables, you will be able to create a quilt that is perfect for you and will become a treasured family heirloom.

A Brief Story of How My Fish Quilt Pattern Came to Be...


Determined My Reason
As a quilt designer, I am constantly searching for new ideas or images that I can turn into a beautiful design for a quilt. The idea for my first fish quilt pattern came to me from a personal experience that is very near to my heart. Several years ago, my son and daughter-in-law decided to adopt a little boy from Haiti. The process was long and arduous. Emotions were up and down, but the day finally came when I was able to meet my new grandson. And in honor of his arrival, I created a beautiful brightly-colored fish quilt for him.

Determined My Fabrics
I used many different batik fabrics to represent the bright colors of the tropics and the spirit of the Haitian people. I someday want to be able to sit down with my grandson and explain to him the story behind his fish quilt and how it came to be. I will tell him all about the beautiful fish that swim in the Caribbean and of the country where he was born. It will be a special moment.

What Are Batik Fabrics...
Batik fabrics are made from a very specialized process that involves the use of bees wax and paraffin during the dying process. By using the wax and paraffin, the fabric designer is able to create very intricate designs and patterns on the fabric because the dye does not penetrate the fabric. Oftentimes, a batik fabric will be waxed and dyed multiple times to create unrivaled color combinations and patterns. Once the process is finished, the wax is melted from the fabric and the design is fully revealed.

Because of the intense process used to create batik fabrics, they are almost always made from very high quality, high thread count cotton or silk fabrics. This gives the fabric a much more vibrant and detailed look than if the fabric were made from loosely woven fibers. It also produces a very high quality and comfortable quilt for use in your home or as a gift.

Click here to see how to get a copy of "Sea Jewels" - Fish Quilt Pattern. Also, visit my blog and see pictures of this beautiful Fish Quilt. Pattern Design by Cathy Thomas, owner of Cat's Creations and Little House Quilting. Cathy Thomas is the mother of four and grandmother of four. She has been a professional longarm quilter for the past nine and a half years and has more recently launched her own pattern line and blog. To find out more about Cathy and her work, click the link above to visit her blog.