Thursday, 1 April 2010

3D Cross Paper Craft


This is a cute, simple paper craft that results in a 3D ornament you can hang around the room.
3D hanging cross paper craft

Materials:

  • printer
  • paper (I prefer construction paper as it's a bit sturdier)
  • scissors
  • OPTIONAL: crayons (or paint, markers, etc)
  • string, thread, ribbon or wool

Instructions:

  • Print template (there is only B&W available) and color as desired
  • Cut out the template pieces (may require adult assistance and can be done before hand.
  • Cut on one of the dotted line right up to the center.
  • Pick out the two matching cross (this is good practice for young children!)
  • Slide the cross together, top to bottom
    assemble all I have is the snowflake image to show you how it's done
  • Glue a ribbon or thread onto the top (or hole punch a small hole and tie a ribbon through (I used a thread and it worked really well)

Options:

  • instead of simply coloring the template, here are some thoughts for alternatives:
    • sparkles or sparkle glue
    • Salt Drip
      • 3 parts flour
      • 1 part salt
      • food coloring
      • water

        Mix together 3 parts flour, 1 part salt, food coloring, and enough water to make a dripping consistency but not too runny. Use a popsicle stick to drip onto paper shapes. Will dry hard and sparkly.

Notes:

  • There are some brief instructions written right on the template
  • If you want your cross to be two-sided, print two templates out and glue matching cross together back to back. Do everything else as directed.
  • Close template window when done printing to return to this screen.
  • Set page margins to zero if you have trouble fitting the template on one page (FILE, PAGE SETUP or FILE, PRINTER SETUP in most browsers).

Template


Palm Leaf Fold and Cut Craft


This is a fun Palm Sunday craft that works a lot like cutting out paper snowflakes. The fronds end up being large enough that the children can carry them around waving them for a Palm Sunday parade.

Materials:

  • printer
  • paper
  • scissors
  • paper clips
  • green construction paper
  • scotch tape
  • OPTIONAL: Green pipe cleaner

Directions:

  • Print out the template of choice. (the templates have the directions on them)
  • Cut this template along the dotted line.
  • Fold a piece of green construction paper in half and paper clip the template so the dotted line is along the fold.
  • Cut through the template and both layers of construction paper along the black lines.
  • Discard the template (unless you want to make more leaves).
  • Unfold the construction paper to see your finished palm leaf.
  • Tape a green pipe cleaner as a stem
    or
  • Roll a second piece of green construction paper into as tight a tube as possible and tape it so it will stay. Tape that to the center as a stem
  • Close the template window after printing to return to this screen.
  • Set page margins to zero if you have trouble fitting the template on one page (FILE, PAGE SETUP or FILE, PRINTER SETUP in most browsers).

Template (color) or (B&W)

(the templates have the directions on them)

Tuesday, 23 March 2010

Easter Basket Projects For Easter Parties

Easter Basket Projects For Easter Parties
By Beverly Frank
If you are planning to have an Easter party it can be fun to include an Easter basket project as a fun craft to do during the party. This way you can have the kids occupied with something fun and best of all they have something really great to take home with them at the end of the party. You can also fill these crafts with goodies for a party favor which makes them extra special. Here are some Easter basket projects for Easter parties-
Woven Bunny Basket- This fun craft uses open weave small baskets (available at most craft stores) or you can recycle pint sized strawberry baskets.
What you will need:
  • A small basket with an open weave
  • Ribbon or precut foam pieces that measure the width of the open weave-Easter colors work especially well
  • A satin bow to tie on the handle
  • A tag for personalizing (optional)
Instructions for the project: Give each child a basket and the precut ribbon or foam pieces. They can then begin weaving them through the open weave of the basket. Have them continue weaving until the entire basket is covered. Tie the satin bow onto the handle and add a tag with their name on it if you want to.
Mini Easter egg baskets- These small baskets will charm your party guests with their springtime flair.
What you will need:
  • Mini Easter Baskets
  • Tacky Glue
  • Alphabet Beads
  • Nylon Monofilament
  • Colorful Trim-this can be ribbon, rickrack or even foam pieces
  • Artificial Easter Grass
  • Scissors
Instructions for the project: String on the alphabet beads to spell out the child's name on a piece of nylon monofilament. When you have all the beads on a string you can then push the ends through the basket weaving and tie off on the inside. Trim carefully and then glue on colorful trim. Put some grass in the bottom of the basket and fill with treats.
Cotton ball lamb basket- This charming basket will have your party guests thrilled with the results.
What you will need:
  • Empty Container
  • White Craft Foam
  • Styrofoam Egg
  • Wiggle Eyes-10mm work well
  • Cotton Balls
  • Low Temp Glue Gun
  • Scissors
  • Ribbon
  • White Acrylic Paint and Brush
Instructions for the project: Paint Styrofoam egg white and let dry completely. Cut two ears out of the craft foam. Make a small slit in the sides of the lambs head (the Styrofoam egg). Put a dab of glue on the ears and gently push the ends into the slits. Tear apart some cotton balls and glue to the head of the lamb. Tie the ribbon into a bow and glue to the lambs head. Carefully glue the cotton balls all around your container covering it completely. After the basket is dry you can glue the egg to the side near the top to make a head. Cut a 1" strip of craft foam and glue the ends to the sides to make a handle for your basket.
Easter Treasure Box- Who says that an Easter basket can only be a basket? This clever craft turns a simple box into an Easter treasure box that outshines any basket.
What you will need:
  • Paper Mache or small wooden treasure box (available at most craft stores)
  • Paints in a variety of Easter colors
  • Paint and Foam Brushes
  • Assorted decorating supplies (jewels, stickers, rub-ons, ribbon, markers etc.)
  • Glue Dots
  • Easter Grass
  • Plastic Eggs
Instructions for the project: Have the child paint the entire treasure box and let dry completely. It is important to prop the lid open as it dries. After the treasure box is completely dry have the child decorate the outside as they desire. Add some grass and plastic eggs.
Looking for more Easter activities? visit http://www.easterbunnyfun.net/ for crafts, coloring pages, recipes, poems, and the opportunity to share your best Easter memories.

Easter Crafts - How to Make Edible Miniature Coconut Bunny Nests

Easter Crafts - How to Make Edible Miniature Coconut Bunny Nests
Making miniature nests is easy, fun and requires no particular skills. You will need a bag of shredded coconut, approximately one pound of white chocolate, food coloring and wax paper.
Place the chocolate in a microwave oven safe bowl and turn on high for two minutes. After the two minutes are up, stir the chocolate. Repeat, until the chocolate is melted. If you choose to melt the chocolate on the stove, use a double boiler. Chocolate burns very easily.
After the chocolate has melted, add a little food coloring. Green is nice if you want a grass looking effect. In order to work with the chocolate and coconut, it needs to be a little thick. Add coconut as needed. You may need to work quickly, depending upon the temperature in your home. Mix well.
Drop the mixture by spoonfuls on a sheet of wax paper. Size of the spoon is a personal choice, depending on how large you want to make the nests. While mixture is still warm and pliable, shape into a nest, by creating a hollow in the center of the mixture. They will harden quickly.
Before they harden, you may choose to put two or three jellybeans in each nest. These are "Bunny eggs." Yellow or white jellybeans can be used for duck eggs. Choice of candy fillings is up to you.
To use the nests to decorate a cake, place the nests on the cake along side a marshmallow bunny or duck. They can be used as decorations on top of gelatin and fruit salads or pies.

Monday, 15 March 2010

Easter Chick to Cover a Cream Egg

Easter Chick to Cover a Cream Egg
Easter is coming so we had better get cracking!!


To make an Easter Chick to Cover a Cream Egg you will need...
  1. Small amount of yellow DK yarn
  2. A pair of needles UK size 3.75mm / 9 / US 5
  3. Small amount of stuffing for the head
  4. Small piece of felt for the beak (or Red Craft Foam)
  5. Chocolate egg, plastic or hard boiled!
Body:
Cast on 26 stitches.
  1. Row 1: K1, increase 1, K to the end.
  2. Repeat first row until you have 36 stitches on the needle (10 rows)
  3. Knit four rows. (14 rows)
Shape the tail:
  1. Row 1: K3, bring yfwd, slip next stitch, ybk, move slip stitch back to left needle. Turn
  2. Row 2: K3 to end
  3. Row 3: K2, bring yfwd, slip next stitch, ybk, move slip stitch back to left needle. Turn
  4. Row 4: K2 to end
  5. Row 5: Cast off 10 stitches, K to end
  6. Repeat last five row for the other side to shape tail.
  7. You will have 16 stitches left in the centre of your knitting.
Head:
  1. Rows 1-4: Knit
  2. Row 5: K1, K2tog, K to last three stitches, K2tog, K1.
  3. Rows 6-8: Same as row 5
  4. Rows 9-10: Knit
This will leave you with 8 stitches. Cut the yarn leaving a length 30cm (12") long.Thread a needle with the 30cm length and run it through the 8 remaining stitches, pull them tight. Continue with the yarn to sew up the head, back and side leaving a hole big enough to insert an egg. Stuff the head lightly. Insert the egg, this will give you the body shape making it easy to see where the neck should be. With a needle threaded with the yarn, do a running stitch to cinch the neck (not too tight) fasten off securely. The eyes are french knots made from black yarn. However if the chick is for an older child or an adult - Glue on some wobbly eyes for comic effect! Sew on a beak made from red felt or Red Craft Foam.
Funky Fluffy Chicks
Using he same pattern and fluffy wool you can create really funky Easter Chicks.


Funky Easter Chick to Cover a Cream Egg

Fluffy Knitted Easter Chick


Go on Knit some Easter Chicks to cover Cadburys Cream Eggs for the Kids this Easter!


Garden Habitats to Encourage Wildlife into Your Garden

Our gardens are home to a wide range of living creatures. An average garden could hold over 2,000 different species of invertebrate. Many of these are very small, so are often over-looked. With all this diversity of life it is good to know that very few creatures cause significant damage to our prized flowers, fruit and vegetables, the ones that gardeners call pests. Even better, there are many more creatures that help us control the pests.
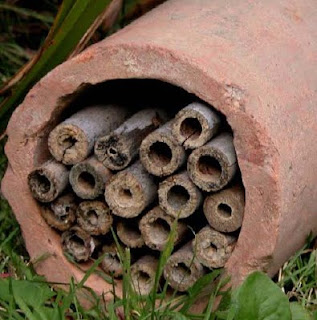
Holes for solitary beesBees Flats
Holes for solitary bees. There are many different
species of solitary bee, all are excellent pollinators. The
female bee lays an egg on top of a mass of pollen at the
end of a hollow tube, she then seals the entrance with a
plug of mud. A long tube can hold several such cells.
Hollow stems, such as old bamboo canes, or holes
drilled into blocks of wood, make good nest sites for
solitary bees. Holes of different diameters mean many
different species can be catered for.
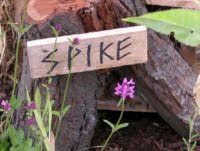


Hedgehog houseHedgehog house
Hedgehogs are loved by most gardeners as the eat many slugs, they also consume earthworms, beetles, spiders, caterpillars, millipedes and woodlice. Hedgehogs need a secure place to build their nests in; a wooden box under a pile of sticks and debris in a sheltered corner is ideal. Our hedgehog home has
dry leaves inside as bedding.


Toad hole id=Toad hole
Frogs and toads eat many slugs and other garden pests. Although they need a pond to breed in, they can spend most of the year out of water. We use stone and tiles as these provide the cool damp conditions amphibians need. Newts may also take advantage of these conditions. Amphibians need a frostfree place to spend the winter; this could be in the centre of our habitat, inside the base of a dry-stone wall, under a pile of rubble or deep underground.