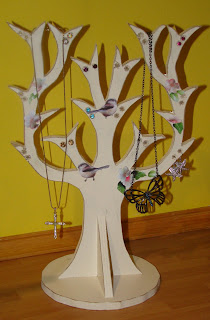
The shabby chic jewellery tree is a hand made wooden tree that stores and shows off your earrings and necklaces. I painted this one in the shabby chic style, but you could just as easily paint the tree in gold or silver, or a funky hot pink.
The tree is easy to make and there is a handy template to draw around, simply click here to view the template.
To make the shabby chic jewellery tree you will need...
4mm MDF wood,
The template,
Wood glue,
Gold and cream paint,
Sand paper,
Clear varnish,
Some images of birds to decoupage the tree.
First print out the template and cut it out. The template is of half a tree. Draw around the tree onto the wood, and then flip the template over to draw the other half of the tree. You will also need to draw out the triangle templates on to the wood, these are the tree supports. You also need to make a base for the tree. I drew around a saucer with a shaped edge, but a circular saucer would be just as good.
Next you need to cut out the wooden pieces. I used an electric fret saw.
Once cut out, sand all the edges to make them smooth but don’t round off the edges.
On the template there the dots are shown, you need to drill holes at these points to hold the earrings. Once drilled, countersink each hole on both sides and sand off any untidiness.
Apply glue to the bottom trunk edge of the tree and stick it to the centre of the tree base. Apply glue to the two short edges of the tree supports and stick one at the centre front and one at the centre back of the tree. Leave to dry.
Apply 2 coats of gold paint to the edges of the branches on both sides of the tree.
Apply 2 coats of cream paint to the whole tree, supports and base.
When the cream paint is completely dry, lightly sand the edges of the tree to reveal the gold paint beneath. Do this on each edge of the tree on both sides.
Cut out the decoupage images, I chose birds and blossom. Arrange them in a pleasing way on both sides of the tree and glue in place with paper glue. And leave to dry.
Finally apply 2 coats of clear varnish to protect the paint work. Make sure that the varnish says on the time that it doesn’t have a yellowing finish; otherwise it will affect the colours of the finished tree.
Monday, 5 December 2011
Thursday, 1 December 2011
Snake Skin Scarf Knitting Pattern
Knit yourself a cute snake scarf to wrap around your neck to keep you warm this winter. The snake scarf is great fun, and has a wiggly cable detail down his back. Knitted with chunky wool, makes this scarf a quick knit and an ideal quick present to knit for someone.
To knit the Snake scarf you will need...
200g or more of Wendy Pampas Mega Chunky wool in any colour you want your snake to be,
6mm knitting needles,
Cable needle,
20mm sew on wobbly eyes and some red satin ribbon for his tongue.
The knitting pattern for the snake skin scarf can be bought here...
Subscribe to:
Comments (Atom)


