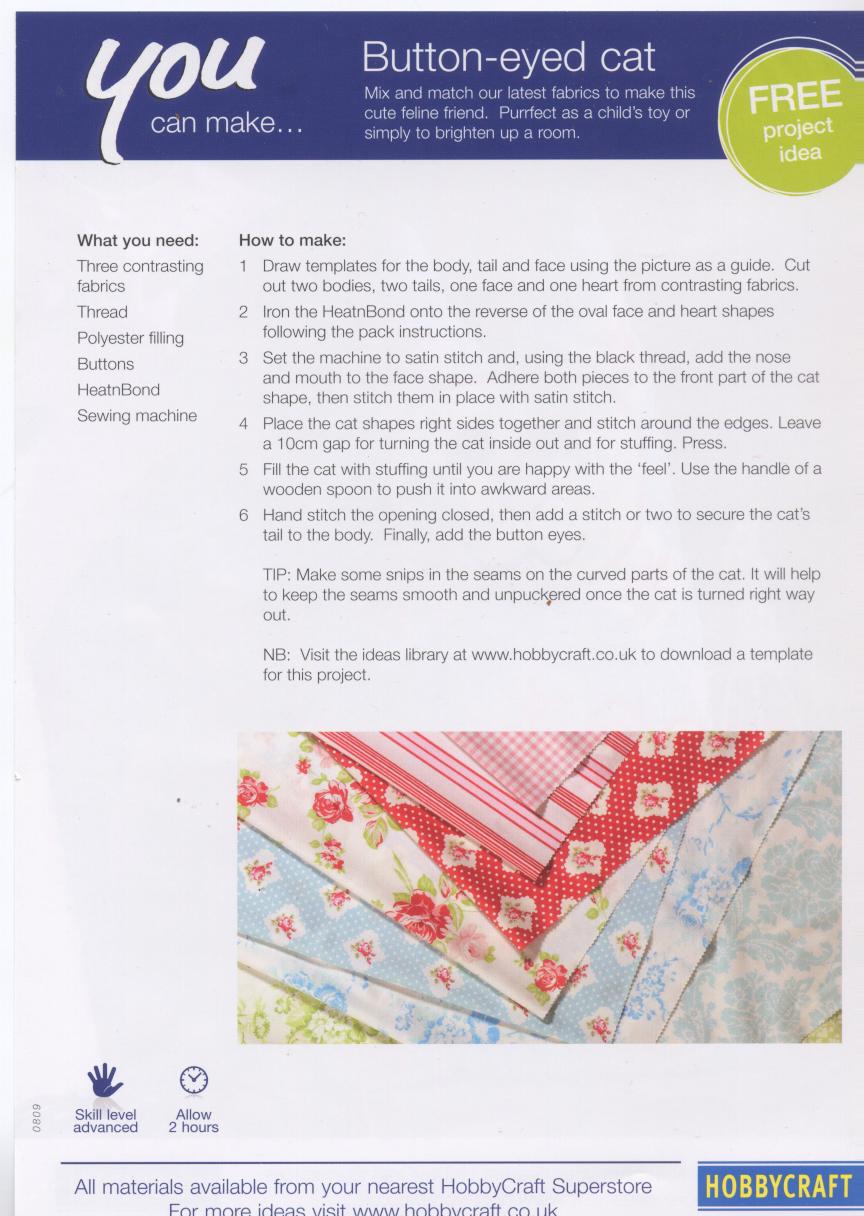
Tuesday 22 February 2011

How To Make Cake Pops

How To Make Cake PopsBy Jason Hatch

Cake pops are one of the treats kids love! They prefer these sugary delights served up on their birthdays and even when their friends stop by for a sleepover. Cake pops are not just for kids either. People of all ages can enjoy them.

This type of cake is actually very trouble-free to create. It may be a little bit overwhelming, but once you get familiar with it you will surely have them on your table in no time. You just have to gather all the ingredients needed and voila! You will surely have instant dessert in no time!

If you want to make cake pops then you can easily find a number of recipes around the Internet that would assist you in preparing this delicious dessert. There are additionally tons of recipe books that you can obtain from online shops and bookstores. This delight will surely make your kids grateful and even those young at heart will definitely find this sugary delight enjoyable! So to give you a good start I will share with you several of the simplest recipes for this sugary delight.

Here are a couple of the recipes for cake pops.

Candy Melts Cake Pops
Here are the ingredients you need:

1 small package cake mix of your choosing, 1 can frosting of your preference, 1 bag candy melts or chocolate bark, sucker sticks and a Styrofoam block

Here are the instructions:

1. Bake one 13x9 cake according to its package and let it cool on the rack. Break up the cake after it is cooled and blend 1 can of frosting. Refrigerate the combination for 15 minutes.
2. Remove the creation from the fridge and shape them into bite-sized balls. Pop all the balls into the sucker sticks then set them all back in the fridge for fifteen minutes.
3. Dissolve your candy melts or chocolate bars whilst pops are in the fridge. Some prefer the candy melts because they typically come in assorted shades.
4. After fifteen minutes, take out the pops from the fridge. Immerse each of them on the melted candy melts or chocolate melts.
5. Place in the stick on the Styrofoam blocks and let them to harden there before you serve your pops.

Decorated Cake Pops
Here the ingredients you need:

1 box carton yellow cake mix, 1 can tin vanilla frosting, 1 bag paper bag candy melts or chocolate bark, sucker sticks, a Styrofoam block and some decorated bedecked candies and sprinkles

Here are the directions:

1. Prepare and bake one yellow 13x9 cake according to its carton and let it cool on the holder. Break up the yellow cake after it gets cooled and blend 1 can of vanilla frosting. Refrigerate the yellow cake combination for 15 minutes.
2. Remove the yellow cake combination from the fridge and form them into bite-sized balls. Place all the yellow cake balls into the sucker sticks then place the entire group back in the fridge for another fifteen minutes.
3. Dissolve your candy melts or chocolate bars while pops are cooling in the fridge. Some prefer the candy melts since they generally come in different flavors and shades.
4. After fifteen minutes, take out the chilled pops from the fridge. Immerse all of them on the melted candy melts or chocolate melts. Set a few decorations on it. You can make a feature on it if you want or some creature face also.
5. Place the stick on the Styrofoam block and allow them to harden there before you hand out your sweet pops.

These cake pops recipes will certainly be loved by kids and kids at heart!

Craved Cupcakes offers a variety of cake pops, cupcakes, and cookies to order online. Next time you need a sugar fix, think Craved Cupcakes.


How To Make A Tutu Skirt In Less Than 30 Minutes

By Valerie Longhurst


If you are looking for a quick and easy gift for a young girl's birthday or you have a little dancer at home, you can benefit from learning how to make a tutu skirt. There is actually a simple method that requires no sewing and takes about a half hour. Then she can play dress up and dance for hours looking pretty.

How to Make a Tutu Skirt

Once you have your tutu completed, your daughter, or your child's friend, can enjoy it as a costume for Halloween, wear it to ballet class, practice dancing, or use it to play dress up. Thankfully, it is not complicated at all and there is absolutely no sewing required. You can certainly make more than one in an hour or two.

You will need a durable material for the waist, such as an elastic band or a thick, strong ribbon. Make sure it is wide and strong enough to hold on your little one's waist when she is moving around.

The major material for the tutu will be tulle. Cut the pieces into the size that you need to fit your girl. To make a nice full tutu, use twice as much tulle and fold it in half. You will leave the folded end at the bottom and make a knot at the open ends to your support band or ribbon. Make sure that you don't crimp the band and keep the knots even and very close together. For a professional and boutique quality look, you don't want to leave any space in between the knots. If you do choose to leave some space in between, make sure that it is a very small gap and that it is even all the way around.

You can secure the ribbon with glue and a knotted bow. You can also use a nice strong glue to secure the end of the elastic. Once everything is secure and in place, you can add decorations.

You can buy various embellishments for your tutu that will make it unique. You can really get creative with the colors of tulle, bows, ribbons, lace, chiffon, beads, glitter, and a host of other deigns. One other option is to buy two different colors of tulle and alternate them around the band. The possibilities are virtually endless.

Now that you know how to make a tutu skirt you can easily make many more your special little ballerina. Be creative and have fun!

Valerie Longhurst, a tutu enthusiast and instructor, teaches all the secrets, tips and techniques for how to make beautiful boutique quality tutus with her comprehensive step-by-step instructional course. Visit her website for more information: http://www.howtomaketutus.com

Monday 21 February 2011

Scented Candle in a Vintage Chintz Cup and Saucer

Scented Candle in a Vintage Chintz Cup and Saucer

This craft idea was sparked off after a shopping trip to Marlborough, where I saw some beautiful cup and saucer candles. They were very sweet but rather pricey, and I knew I could make cup and saucer candles at a fraction of the price.

I do love candles, and I usually buy scented candles. So I thought that if I was making cup and saucer candles that I would make scented cup and saucer candles. I also love a bit of Chintz, so I set out looking for Chintz style cup and saucers to make my candles in.

To make a cup and saucer candle you will need…

Cups and Saucers, or just cups is fine too,
White wax beads,
Essential oils for fragrance,
Wax dye flakes,
Wick,
Wooden skewers,
Ribbon and flowers to decorate,

Scented Candle in a Vintage Chintz Cup and Saucer
The best place to find odd cups and saucers for this craft is car boots, garden fates and charity shops. Choose cups and saucers that you think are pretty. Take them home and give them a good wash and allow them to dry completely.

Put the wax beads in a glass jug, stood in half a pan of boiling water as if you were melting chocolate. Don’t allow the water to bubble over the sides of the jug and contaminate the wax. The wax does take a while to melt so whilst it is on the hob, turn your attention to setting up the cups.

Set out the cups and saucers, and add one or two wax dye flakes to each cup; this will give your candle a pail pastel shade that is in keeping with the chintz look.

Next you need to add a couple of drops of essential oils to the cup.

Scented Candle in a Vintage Chintz Cup and SaucerCut a length of wick that is twice the height of the cup and fold it in half. In the loop that is created, push the skewer through and then turn the skewer around to twist the wick. Lay the skewer across the cup so that the wick is suspended in the centre of the cup.

When the wax is melted, pour a small amount of wax into the cup and with a spare skewer, give the wax in the cup a stir to melt and mix the dye and the essential oil. Then top up the cup with wax slowly as to not disturb the wick. If your cup has a pattern on the inside at the top, make the top of the candle just reach below the pattern so that it is still visible.

Finnish filling all the cups in this way with the melted wax and then set the candles to one side to cool and set.

To finish off, tie a slim ribbon on the handle of the cup or around the bowl of the cup to decorate. If you are making the cup and saucer candle as a gift, you could write a special message on a brown card luggage label and tie that to the cups handle.


Wednesday 16 February 2011

Easy Home Made Dog Toys

Easy Home Made Dog ToysBy Jimmy Sam Karter

Construct your own homemade dog toys inexpensively. All you need is a little period of time to hunt for needful materials. Toys of dogs are generally expensive and don't tend to last very long, so building house made varieties that are inexpensive is best, particularly when you have a dog that truly love his homemade toys. Here is the list of most popular home-made dog toys that you can easily construct at your house.

Naughty Rope-:
Worn out fragments of rope build excellent dog playthings. The easiest version is to directly take about a rope, then fasten a knot in the middle. The second knot on top of the first makes for a sturdier toy and provide your dog with a good place to grasp it.
A knot on each end of a length of rope makes a fun toy, and you can prepare these out of various lengths to give your dog variety.

Loop Loop-
Take a longer length of rope, approximately two feet, and tie the ends closely to make a loop. This toy is fun for dogs who like to play tug, and particularly works great if you have a male and female dogs.

Bone Toy-:
It's very easy to cut out some bone shaped portions of clothes and then sew them most of the way together, stuff the toy with wool pieces or cushion stuffing. These playthings can be made very rapidly and easily.

Toys With Sound-:
To Construct a toy which produces sounds, keep some crispy beans in a clean bottle with a children-proof lid. Place the box inside the homemade stuffed toys.

Sock Toy-:
A fast and simple dog toy is to take an old, cleaned sock, split a plump carrot in half, then keep the carrot pieces into the sock. Tie the mouth of the sock and let your pup play with it. Dogs like to bite on these and best of all these toys are inexpensive.

Tire Toy for Strong Dogs-:
Dogs with extremely strong jaws need toys that will stand up to a lot of abuse. One of these is a toy made out of an old tire. Tie a rope through the tire, then suspend it from a tree at the dog's ears level. Once your pet gets used to enjoy with the tire you may want to raise it a bit to make it even more interesting. Make sure your pet does not chew sections off of the tire, if he/she consume them it could make him/her ill.

http://www.dogowner.webs.com

Saturday 12 February 2011

How to Make a Frilly Collar or Ruffle for your Dog

How to Make a Frilly Collar or Ruffle for your DogHas your dog got somewhere special to go a party or a wedding maybe and you want them to look dressed up for the occasion? Well a frilly dog collar or a Ruffle for a lady dog is the perfect accessory and quick and easy to make.

If you are going to a medieval wedding a Ruffle is also great for a male dog.

To make a frilly dog collar for a medium sized dog you will need…

Fabric – I used Velvet, but anything you have to hand will do.
Wide lace,
Ribbon,
Satin roses to decorate if desired.

Cut out a rectangle of fabric 50 inches by 8 inches. Fold the two ends together and cut the corners so that they are rounded. Over lock or zigzag the edges of the fabric.

How to Make a Frilly Collar or Ruffle for your DogSew the lace to the edges of the fabric to cover the zigzag stitching. There’s no need to gather the lace sew it on flat. When you get back around to the beginning, let the lace overlap the starting lace by an inch or so.

Fold the fabric in half lengthways with the right sides together and pin. This will show you where the centre of the strip is. Hand sew running stitches up the middle of the fabric drawing up the fabric tightly as you go.

Un-pin and lay the fabric out wrong side up and mark the centre point.

Take 54 inches of ribbon and cut the ends on a slant to prevent fraying. Find the middle of the ribbon and pin it into place on the centre point of the ruffle. Pin the ribbon onto the ruffle on the running stitches and then sew into place.

Allow the wrong sides to close together to complete the frilly collar, and simply tie the ribbons in a bow around the dog’s neck. You can add satin roses or ribbons to the ruffle at the front if you wish to.


Tuesday 8 February 2011

How to Make Medieval Cannon Wedding Favour Boxes

How to Make Medieval Cannon Wedding Favour BoxesMedieval cannon wedding favour boxes are unusual and look really nice at a medieval theme wedding. I wanted to make medieval wedding favours something special, and really look the part. I found lots of organza wedding favour bags on the internet and velvet pouches which do look medieval, but nothing that was ‘different’, a medieval wedding is a bit over the top and I wanted wedding favours that were a bit bonkers too.

I had the idea to make medieval cannons that went bang. Cannons were becoming popular in Europe during the end of the medieval era, so that all fitted, and I thought that cracker snaps would provide bang for my unusual wedding favour boxes, and from this starting point I designed the cannons.

Medieval Cannons do take a while to make, and there is a lot of preporation work, so you either need to start early, or only make them if you have an small number of guest – 50 or so.

The cannons dimensions are: Height 6.5 cm, Length 10cm, depth 7cm

To make a Medieval Cannon Wedding Favour Boxes you will need...
How to Make Medieval Cannon Wedding Favour BoxesA print out of the cannon parts (click the pattern on the right and save image)
Thin black card,
PVA glue,
Cracker snaps,
Black tissue paper,
Wing back paper fasteners,
Silver Glitter Glue,
Chunky lolly pop sticks (you can buy these from craft shops),
Trinkets to put inside the cannons – I added, chocolate gold coins, ‘Thank you for coming’ poems and medieval looking rings for ladies and medieval key rings for the men.

Stick the print out onto card and cut it out – use this as the cannon stencil and draw out one of each pattern part for each cannon and cut them out. I found it easier to keep all the parts separated so that instead on making one cannon in turn, I could have a conveyor belt of tasks and make all the cannons in stages together.

Take the cracker snaps and write ‘Pull >>>’ about 2cm from the end, then paint some glitter glue on the same end about 5mm or so to the end. Leave to one side to dry.

Cut your lolly pop sticks to be just shy of 10 cms. You will need one lollypop stick for each cannon.

Now all the parts are prepared, you can begin to build your cannons.

Stage One – The Barrel
Always make sure that any pencil marks that are left over from drawing around the stencil end up on the inside of the cannon where no one will see them.

Take the body part and apply PVA glue to the tab, curl the other straight edge around to stick onto the glued tab. This makes the barrel of the cannon. Close pegs are great to hold the card in place whilst the glue dries.


Stage Two – The Wheels
First you need to make a hole in the spindle part of the wheel spokes. Put a blob of Blue-tac on the table and push a sharp pencil through the card on to the Blue-tac, and voila you have a neat hole.

Next turn back the tabs on the wheel spokes and apply some PVA glue to each, then take the wheel rim and wrap it around the spokes to form a wheel. Again Pegs are really useful here to hold the ends of the rims whilst it sticks.

Stage Three – The Cannon Stands
Again the stands need some prep work. Make holes in the stands on the cross. There should be two holes in each stand. Also the fold lines need scoring to make sharp folds later on in the process. Use a compass point and a ruler to score all of the fold lines.

Then take a wheel and push a paper fastener through the hole of the wheel and through one of the holes of the stand and open the wings of the fastener up at the back. Add another wheel in the same way to the other side.


Stage Four – Adding the Cracker Snaps
Run some PVA glue down one side of a lolly stick. Onto the lolly stick add the non glittered side of a cracker snap – at the other end make sure that the pull writing is face upwards. The bang part of the cracker snap should be about 5mm away from the end of the lolly stick.

Apply more glue onto the lolly stick and then turn it over and fold the glittered half of the cracker back onto the un-glued sided of the lolly stick. Then stick the stick to the inside of the cannon barrel over the seam where you glued the barrel sides together.

The glittered cracker snapper should be sticking out of the top of the wide end of the barrel.
Snip off any excess cracker snapper (non glittered end) from the lolly stick.

Stage Five – The Cannon Ends
The cannon caps fit onto the slim end of the cannon where a cannon ball would shoot out. You can leave a hole because the trinkets inside would fall out.

Make some of the snips in the sides a bit deeper as this will help when you slot it into the barrel. Then fold each on the tabs inwards and then push them out again so that they stand up. The caps back into the cannon ends leaving a small ridge, with this in mind, apply glue to the out side of the tabs. Then push the cannon cap into the cannon and press firmly so that the cap tabs stick to the barrel.

Snip off any surplus cap tabs that over hand the barrel.

If you make a bit of a gluey mess on the black card, wipe off straight away with a damp cloth and it should be fine.

Stage Six – Filling the Cannons
The glitter end of the cracker snap will be sticking out of the cannon and will start to get in the way at this stage, so just fold it where the top of the cannon touches it so that it bends over the barrel. The cracker snap should run diagonally from the front bottom of the cannon, to the top back of the cannon.

Find something circular which is about 5mm bigger than the end of the barrel. I used a small wine glass. Fold up the black tissue paper and draw around the wine glass on to the tissue paper and cut out. These circles close the end of the cannons.

Put your trinkets inside the cannon, and then apply some PVA glue around the outside of the cannon where the opening is. Then lay one tissue paper circle on the top of the cannon opening, and fold down the edges of the tissue paper on to the glue. Leave the cracker snap end to stick out of the back of the cannon.

Apply glue to a cannon rim, and starting at the bottom where the barrel seam is, stick on the rim to cover over the untidy ends of the tissue paper. The rim goes all the way around the end of the barrel and meets back at the seam at the bottom.

Stage Seven – Finishing Touches
Fold the wheel stand and apply some PVA glue to the top parts of the stand that hold the wheels. Note that the highest part of the stand is at the back and this should be stuck next to the Cannon Rim on the back of the cannon. Stick these parts to the barrel but allow the barrel to be elevated somewhat. If your trinkets are heavy you will need to point the cannon downwards otherwise it will tip that way and the wheels will be up in the air.

Then add a final bend in the glitter part of the glittered cracker snapper, bend it in half so that the end points to behind the cannon.

There you have a very unusual wedding favour box which not only looks fantastic but also provides some fun with the bang when your guest pull the cracker snapper tab.


Monday 7 February 2011

Make a Ring Box Treasure Chest


This is a cute craft to make a ring box treasure chest. The chest is ideal for gift boxing a ring or you could just make it for fun to hold your own rings. The Treasure chest has a look of pirates treasure or a medieval box.

To make a Ring Box Treasure Chest you will need...

A Treasure chest style box – you can get these for a couple of pounds at HobbyCraft,
Wood stain,
Brass Paint,
Clear varnish,
Satin Fabric,
Velvet fabric,
PVA glue,
Thin card,
And a plastic pop bottle.

Give the box a light sanding.

Use the wood stain to paint the out side of the box not forgetting the bottom. Paint in long straight strokes to simulate wood grain.

Click Images to enlarge them
Make a Ring Box Treasure Chest

Make a Ring Box Treasure Chest

Make a Ring Box Treasure Chest
Slightly over lapping the brushstrokes make the grain look really good because some parts stain darker than others. A dark wood stain gives the box age and makes it look like it’s much older than it is.

When the out side of the box is dry, paint the inside with the same wood stain that you used before. The top edges need painting because they will be visible when the box is finished and paint slightly down the four sides. In the same way, paint the inside of the lid.

When the stain is dry, apply a coat of clear varnish.

With brass coloured paint, paint thin strips following the ends of the box on the ‘D’ shaped sides and follow that brass line onto the back, front and top of the box to give the classic treasure chest look. Also paint a ‘lock’ on the middle front of the box and lid.

Lining the Box
Measure all of the sides of the inside of the box and cut out thin card panels. Test the panels out to see if they will all fit neatly inside the box and inside the lid. The card panels need to be slightly smaller, rather than being a tight fit.

Put the card on top of the wrong size of the satin fabric and cut the satin 5mm bigger than the card. Apply glue to the edges of the card and stick the 5mm of fabric to the card to cover the card neatly. When you cover the ‘D’ shaped pieces of card for the lid, instead of gluing, sew a row of running stitches around the curved edge and draw up around the card.

Once all the card panels are covered, glue them into position inside the box and leave to dry. Pegs make great little clamps to hold the panels in place.

To make the arches that hold the rings you need to cut a plastic pop bottle so that it is a sheet of plastic. It’s a good idea to tape the sheet to the table with parcel tape so that you can work on it.

Draw a rectangle that is the long length of the box by the height on the bottom part of the box, doubled.

You will need to cut out 2 of these rectangles from the plastic bottle.

Lay the plastic rectangles on the wrong side of a piece of velvet side by side with the long sides about 5mm apart. Make sure that the natural curve in the plastic means that the long sides curl upwards. Cut the velvet out in one piece about 1cm bigger than the rectangles. Use the velvet to cover the plastic as you did for the satin covered card.

Push the plastic rectangles into the box so that they create an ‘m’ shape. Put the first long side of the plastic at the back of the box, and then push the other side of the plastic rectangle, plus the first edge of the next rectangle, in next. The natural curve of the bottle will help this process, but it does make it a bit springy. Then push the last long edge in the box at the front. This makes a griping ring holder to hold your rings upright.

As a final extra finishing touch, stick a clasp from a kid’s diary onto the front of the box to give it a real looking lock.


Sunday 6 February 2011

Button Eyed Door Stop Cat

I collected this Free craft idea card from Hobbycraft.

Click on the images below, and then click on the image again to make it large enough for you to read.

When you get to the stuffing part, it you fill with sand in a plastic bag, the button eyed cat makes a very attractive door stop.


How to Make a Pecking Chicken Game

How to Make a Medieval Pecking Chicken Game

This was a game I thought up to entertain children during a medieval theme day. The clockwork chickens hop along and do battle knocking over their rivals. The game looks medieval and children love the fun of it.

To make a pecking chicken game you need...
MDF wood,
Hard Board,
Wood glue,
Doweling,
Paint,
7 wooden dolly heads or other wooden balls,
Oddments of colourful fabric and thin ribbon for the bunting.

You will also need 5 or 6 wind up chickens that hop about, a bag of plastic gold coins and the Game Rules, that you can download here.

First cut out a big circle of MDF wood for the arena. The size of this circle will determined how big the arena will be. Make sure that all of your clock work chickens will fit onto it at the same time. My arena 39 cm in diameter.

Cut out another circle inside this circle to create a hoop shaped border. The border should be about 5 cm wide all the way around. Sand all the edges after cutting.

Take the hardboard and cut out a circle 39 cm in diameter to sit on top of the hoop. Glue in to place and sand edges off so that it’s all flush.

When the glue has dried, you need to shape the hardboard slightly so that it is bowl shaped so the chickens always hop towards one another. With the hard board on top soak the arena and put something heavy (I used a brick) in the centre of the wood and leave for a day. If you leave it out side it will dry naturally and develop a slight dip. You can check to see if it has done the trick with a marble, if the marble rolls to the centre that’s perfect, if not repeat the process.

You need to 8 drill holes through the hard board and the hoop for the doweling. I used 15 mm doweling, so my holes required a 15 mm wood drill bit. When measuring where the holes should go, use a protractor and place them 45 degrees apart. Drill the holes and tidy them up with a light sanding.

Cutting the doweling – You need 5 long lengths that go through the arena; these are about 40cm long. And you will need 3 short lengths for the legs at the front edge, these are about 7 cm long.

First, apply some wood glue to a hole and push a short length through so that the top of the dowel is flush with the top of the arena. Then add the other two short lengths in adjacent holes. You may need to sand the tops of the doweling.

The bigger poles need pushing through to with a ‘leg’ left at the bottom which is about the same height as the short doweling. This raises the arena off from the floor. Glue the tall poles into position.

Undercoat the arena and then paint in bright colours.
You also need to paint the wooden dolly heads. I found them easier to paint after I had pushed them onto a few wooden skewers; I then stood the skewers in a mug. 5 beads need painting in a contrasting colour to the poles, and the other 2 need to be the same colour as the poles.

Whilst you are waiting for the paint to dry, you can make a start on the bunting. Cut our some triangles of material from brightly coloured fabric. Make the triangles elongated to make them look medieval. My triangles are 4cm by 9cm. Sew a zigzag stitch with a sewing machine around the edges of the triangles to prevent fraying. I used 12 triangles.

Next you need to sew the triangles onto the ribbon to create the bunting. Measure 30 cm and then sew on the first triangle, leave a 4 cm gap and then sew on the next triangle, this is for the slopped start to the bunting. The rule of thumb is that you need to leave about 6 cm of ribbon to pass by a pole and then a 1.5 cm gap between the two triangles that hand between poles. This gives the bunting a nice swag. You need to sew 4 sets of triangle sin pairs, and then leave 6 cm and then add a triangle, leave 4 cm leave a triangle and then leave 30 cm of ribbon before cutting.

Put a blob of glue on the top of each post, and attach the bunting with the ribbon tops at the back. The ribbon should sag slightly between poles. Once the ribbon is in place stick a contrasting dolly bead on the top of the pole to finish it off. Wipe off any excess glue. At the two ends of the bunting, glue or staple the ribbon to the arena floor half way between the last pole and the first leg. Cut off excess ribbon and glue a pole coloured dolly head on the ribbon end.

Medieval Chicken GameIf your dolly heads have holes in them as mine did, you will need to fill the holes with wood filler, sand flush and paint. This also gives you the opportunity to touch up on the paint in other places.

Your pecking chicken game is now complete, you just need to print of the rules, I framed the rules in an inexpensive gold looking frame. And you need to stick coloured pompoms to the tops of the chicken’s heads so that you can tell them apart.


Tuesday 1 February 2011

How to Make Decorative Medieval Shields

Decorating a room to look medieval can be costly if you buy or rent authentic looking props. However, you can make medieval decorations to make a room look fit for a medieval knight and making medieval shields is a great way to add a taste of the middle ages.

To make a medieval Shield you will need…

6mm think MDF wood,
Paints,
Clear Varnish,
Wood Glue,
Webbed tape,
Design Ideas.

First you need to make a Shield template from a piece of paper. Get a sheet of paper about the same size as you want the shield to be, and take into account the size of the sheet of wood. Fold the paper in half lengthways, and then in half again. Open out the second fold. From the crease of this fold, on the edge of the paper, draw a curve to the centre fold at the bottom of the paper. Cut out this curve and unfold the paper – you should have a shied shape.

Use the template to draw out a shield onto the MDF. Cut out the shield with a Jigsaw and sand the edges off.

Undercoat the shield on both sides and the edges.

Select one side to be the front, and give this side a couple of coats of the base colour paint. Use left over house hold gloss, satin emulsion paints or Humbrol paints. Poster paints aren’t very good to use.

If you need help selecting a design you can search Google Images. When looking at the search results, if you look down the left hand side you will see an option to look for line drawings. If you only search line drawings you can use these as a guide to draw a design onto the shield.

When you have selected an image – if you know how to use your graphics package, you can enlarge the image, print it off and cut it out and use it as a stencil. Otherwise you will have to draw freehand.

When you have drawn the design onto the shield front you can begin to paint it. Be careful not to rest your hand on wet paint.

Finishes the shield by painting the sides Gold – the medieval folk liked gilded embellishments, and give the shield a couple of coats of varnish to make it more durable and shiny.

To make a handle, cut out a 20cm length of webbed tape and glue it to the back of the shield about 8cm down from the top edge. This tape acts as a handle to hold the shield and can also be used to hang the shield up.